|
The Setup Form contains all the basic information about your firm, as well as a few global options that can be set and a page of system information that may be useful for technical assistance. Except for those directly related to purchasing functions, the fields are the same as those in the Design system and work in the same way.
Some fields and options are not available to users who do not have administrative privileges.
The fields and controls on this screen are:
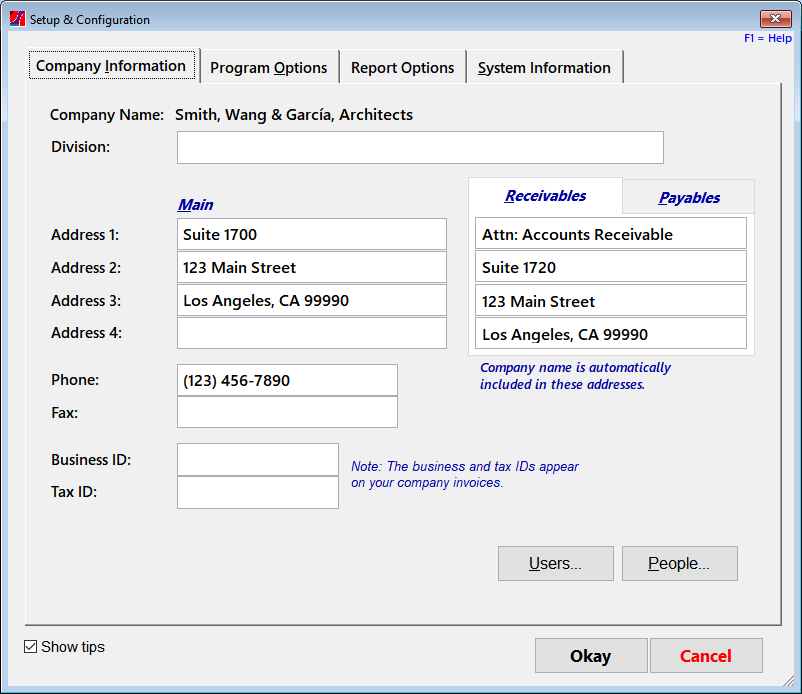
Company Information
|
Company Name
|
This is the name that will appear in the title section (usually a footer) for all your reports and as the "bill to" on orders billed to you. It is encoded in your client key file and cannot be changed except by contacting technical support.
|
|
Division
|
This optional field is added to the end of the Company Name on reports.
|
|
Address 1-4
|
These fields will be used on reports where the firm's address is displayed. This includes the compact, "single-line" format used in standard report footers. Since this line includes all of the fields shown here, there is a limit on how much information you can include if you also use a logo on your reports (see "Report Options").
|
|
Phone, Fax
|
These fields will be used on some reports as the general phone numbers for contacts. Note that some reports may look at the entries for employees or consultants selected as "salesperson," "project manager," etc. to display more specific numbers if those have been entered.
|
|
Business ID
|
(Optional) Your business license number. This can be used in custom reports if needed.
|
|
Tax ID/Number
|
(Optional) A government tax number for your firm. This can be used in custom reports and will appear automatically on standard invoices if entered.
|
|
Users
|
(Only on multi-user systems) This function gives you access to a maintenance form for system users. It only appears and is only available to users with proper access.
|
|
People
|
Use this function to display the Contact Form, used to maintain the list of contacts that can be assigned various roles in a project, such as "salesperson," "designer," etc. Many of the forms where these are used have shortcut buttons that give you direct access to a "mini" version of this form.
|
|
Show Tips
|
This check-box turns off the display of usage hints for each field on the Setup Form.
|
Program Options

|
Default Project Type
|
This allows you to set the default project type (either "design project" or "sales order") for new projects. For most people, this can be left as "design project," however if you are a salesperson, you may wish to use the other option.
|
|
Currency
|
Select the desired default currency to use with your system. The codes shown are the international standard for currencies that are in active use. Note that you can override this choice on individual projects.
|
|
Currency Symbol
|
If a symbol is available that corresponds to the currency you have chosen, it will appear here.
|
|
Use Symbol?
|
This option makes the system use the currency symbol instead of the currency code. Using the symbol makes reports and screens easier to read but may make the currency unclear in some multi-national contexts.
|
|
Tax Label
|
Allows you to control the word or phrase used to describe a sales tax or VAT on quotes and invoices. This defaults to the word "Tax" (using proper case). You can change that to any word or short phrase desired, such as "VAT". This is substituted for the default word "tax" in labels, so do not add words like "amount" since these are already part of the format.
|
|
Default area unit
|
FF&EZ defaults to using square feet (sq ft) as the default measure of area (as in, the area of a room). You can select a different default unit with this control or enter a unit. Note that each project allows you to override this setting if needed for specific international projects.
|
|
Profit % entry
|
By default, FF&EZ displays and treats the % used to calculate a profit as a "markup." That is, if you enter 10%, it will mark up a $100 cost by 10% and calculate the price as $110 (unless the price is locked. See the Specifications List). If you set your system to treat the % as a profit margin, then a 10% profit margin on $100 would be calculated as $11.11 and the price would be $111.11.
Changing your system from one mode to another will translate the % to the equivalent (both are stored internally), not change the prices that have been entered. That is, if you have entered a 10% markup on specs and you switch the system to use margins, the 10% markup will display as the equivalent 9.09% margin, leaving the price unchanged.
|
|
Default Markup
Default Margin
|
If your firm sells FF&E as part of its services, you can enter your "normal" markup (or profit margin — see previous entry) here as a percent. This value will be copied to the "Markup" field when you create new projects and can then be changed for any project. In each project, all specifications default to the project markup and you can override the individual specification markups as desired. Markups are used to recalculate prices until you enter a fixed price, which is then locked.
|
|
Last PO #
Maximum PO #
|
When you first start using the Design/Purchasing system, you may be moving from a previous system from which you had already issued orders. You can use the "Last PO #" to tell FF&EZ the number of the last order you issued from that system.
On the other hand, you may be using FF&EZ simultaneously with an existing system that is used for other types of orders (that is, having nothing to do with FF&E design projects). If so, you can set the "Last PO #" to a very high number and/or you can set the "Maximum PO #" so as to create a range of numbers that allow the two systems to co-exist without duplicating order numbers.
|
|
When creating an order for the primary component...
|
When FF&EZ creates the purchase order items for objects with more than one component, you have the option of having it include a reference to the secondary components on the order item for the primary component. This has the effect of noting that the finished, delivered item also includes other products that are "ordered separately." This option is controlled during process of converting FF&E Worksheet items to orders, but you can set the default option for this here.
You can also set up the default title text for this section, which defaults to "COMPONENTS ORDERED SEPARATELY:" This field can contain up to 50 characters.
|
|
Last Check Request #
|
In the same way that the "Last PO #" works, you can set a starting point for check requests by entering the "last" number used prior to using FF&EZ.
|
|
Default order item detail
|
This option sets the default choice for how much of each specification descripton is transferred to orders (along with required fields like model number):
- The full description includes all descriptive fields including the "Add'l description" field
- "Medium" description includes the short description ("Product/Type") and the basic short fields like "Color" and "Size."
- The short description only prints the "Product/Type" field as the description.
The setting you choose here becomes the default choice each time a user uses the Order... button on the FF&E Worksheet to create new orders.
|
|
Last Invoice #
|
As above, you can set a starting point for invoices by entering the "last" number used prior to using FF&EZ.
|
|
Use "Invoicing Detail" format as default
|
FF&EZ normally issues numbered invoices. However, if you are generating "official" invoices from your accounting system, you can set FF&EZ to issue a numbered "invoicing detail document" instead. This uses the same format as an invoice, but labels certain parts of the format differently so that if you attach the "invoicing detail" to your own invoice, there is no confusion as to how to reference your invoice.
You can choose this option each time you generate an invoice with the Processing command or reprint it, however you can set the default behavior here.
|
|
Default Invoice Title
|
This gives you control of the title text that appears on regular invoices and on "Invoicing Detail" formats. This field defaults to "INVOICE".
Note: The entry here does not affect the title used for the "Invoicing Detail" option that formats an "invoice" for use as a backing data document for 3rd-party invoices. However, you can set that text also by selecting the "Use 'Invoicing Detail'" option above (even if it is only temporary).
|
Report Options
This tab on the Setup Form displays options that affect how reports print and shows a sample "mock-up" of a report title, data columns and title block area so that you can see how your changes will look. Note that some specialized "report" formats (like purchase orders and invoices) may use the report setup options in similar ways but which make more sense within those formats.

|
Report engine
|
Previous versions of FF&EZ used an older report engine that could not print PNG files (although they were displayed by the screen graphics component). As of version 3.2.139, the "Advanced" version is the default and is preferred for most reporting. The differences are:
Legacy - This engine is faster, especially when previewing long reports, however it cannot print PNG files, which are a very common format used on the Internet (i.e., for product images.
If this setting is used, all PNG files will be converted to JPEG format files when they are attached to a specification, however this conversion does not always produce the expected results due to inconsistencies in the conversion of the PNG transparency layer. Existing PNG files in the system will not be converted automatically.
Note that you can use the legacy report engine on an "as needed" basis by right-clicking on the Preview or Print buttons when printing reports.
Standard - This is the base type for the advanced engine, which can print PNG files.. It includes more powerful previewing capabilities, but if you print to a PDF printer with this setting, the PDF files may created in the "image" format, in which no changes can be made nor can the text be selected. We generally don't recommend using this setting.
Advanced - This setting includes a very powerful report previewer that includes the ability to view multiple pages at once and to select pages to view from thumbnails. You can choose the desired printer to use from the previewer's floating manu. This menu includes a "Save" command that can save the report directly to PDF, Excel and HTML formats (please note that extremely complex reports may not adapt well to different formats).
In addition to the capabilities in the previewer, when this engine is active, all report setup forms will include a [>PDF] command button that sends the report directly to a PDF file. It will automatically name the file, then let you change that as needed.
|
|
Report Heading Font
|
The default font used in larger fonts in FF&EZ reports is Arial. You can change the font to a different one by selecting it from those available on your computer. Note: If you select an unusual font in a multi-user environment, be sure that this font is available on all of the workstations that might print reports.
|
|
Report Body Font
|
The default font used in all "non-heading" text is Arial. You can change this font to a different one. Important! Since numbers and shorter character fields on reports cannot "wrap," changing to a font that has a wider proportion than the default font may cause the numbers in some reports to exceed their allocated space. If so, they will display as **,***,***.** instead. On the "Sample" on this screen, you can see the problem when the numbers overlap adjacent columns.
FF&EZ reports are optimized for "normal" case usage (Like this). If you have standardized on using all capitals (LIKE THIS), we recommend that you select a "narrow" type of body font, such as Arial Narrow. This will allow the use of all caps, but minimizes the effect of making reports longer and causing harder-to-read wrapping of text within fixed-width columns.
|
|
Title Block Layout
|
This option gives you some basic options for the layout of the title block that appears at the bottom of all reports. The title block also includes the project "Title" and "Location" fields for all project reports.
The default title block layout is to place the project information and company information on the left, with the date information right-justified. With the options on this tab, you can either center the project / company information or center it and add your logo on the left.
If you use the logo option, your logo will be placed at the top left corner of the logo space (see image above) and proportionally expanded or shrunk to fit. Generally, square logos and those with a moderate "landscape" orientation will look best. "Portrait" oriented logos will also look good as long as they do not include associated address text, which will tend to print too small. Therefore, we recommend that you use a graphics image that only includes the "graphic" portion of your normal logo, since the title block includes all basic company information already.
Note that wider horizontal logos may need "white space" added to the top if they do not appear centered vertically within the logo space. This can be done with any graphics program by pasting your logo into a new blank image larger than the logo and cropping the image to leave space above the logo. The proportions of the logo space are roughly 16:9 (width to height) so, for any logo, adding padding on the top and bottom (or left and right) to create that proportion may be the easiest way to get exactly the right placement you want.
Also note that your logo should be adapted for readability at the small size used here and for the printing type (color vs. black & white) you plan to use most. Subtle color logos may not have the same impact and you may want to develop alternates of the same design for monochrome printing.
Note: If your logo exactly fits the proportions of the space and you have a longer than normal company information fields (see "Company Information" above), the single-line address + contact used in the standard report footer may appear superimposed over the lower left corner of the logo. If that combination occurs, you can add a small amount of white space at the bottom of the logo to "push" the image up and away from the address line.
|
|
Default output folder for PDFs
Default "parent" output folder for project PDFs
|
This option controls the default target folder used when FF&EZ saves a PDF file using the [>PDF] printing commend. The caption for this option will change depending on the setting of the "Add project ID" option.
On multi-user systems, this setting operates on a per-user basis, so each user can set their own target default. It is useful when you typically save PDF files to a general projects folder tree or a network location. There are a few "rules" to understand in how this works:
- FF&EZ normally remembers the last folder you used to create a PDF file until you close FF&EZ. This behavior continues, except...
- The "Add project ID" option will use the default folder as the parent folder and create a subfolder for the PDF file using the project ID for all reports that can be determined to contain only one project (otherwise, it presents the specified default folder). This applies to all project content reports in the Design module and to Purchasing module reports using the "current" project, order or invoice. Purchasing module reports that use an active query will default to the base folder, since they may contain data from more than one project.
- The normal Windows rules about invalid characters in file or folder names still apply for any folder named after a Project ID. See Setting Up Clients and Projects.
- When the "Add project ID" option is in effect, the "last folder used" will only be retained until you print a project-related report, which resets the target folder to that specified for the project.
- If you change the "Project ID" field, a new folder will be created for new reports. Old reports will remain in the folder created for the previous ID value. If desired, these can be cut and pasted to move them into the new folder.
- As of this writing, only the [>PDF] command recognizes and remembers PDF output folders. If you save a previewed report with the "Save to PDF" option on the menu bar, you will need to locate the desired target folder.
|
System Information
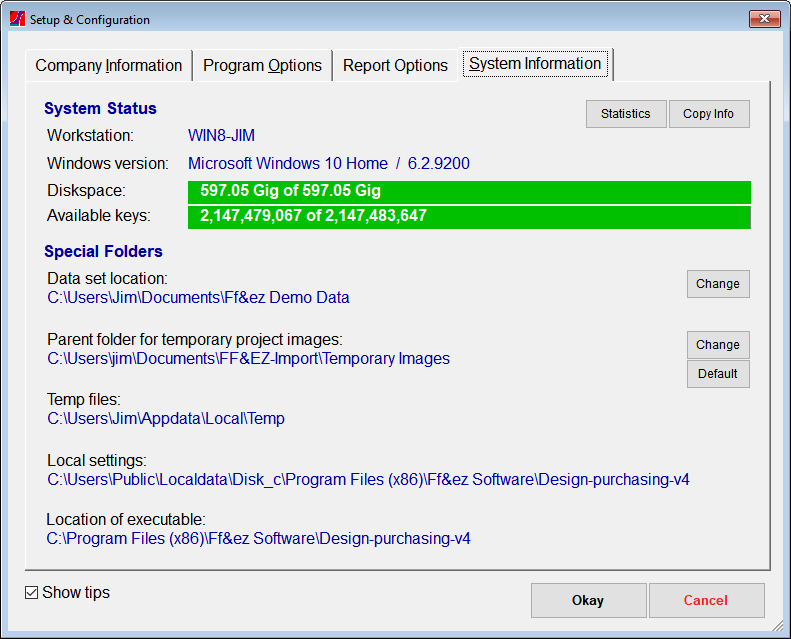
This tab displays information about your computer and the way your workstation is set up to use FF&EZ. The Copy Info button at the top right will copy the most useful information to your clipboard so that it can be pasted into a document or email.
|
Workstation
|
The name of the PC workstation that you are using. This is set through the general Windows interface — FF&EZ is only reporting it here.
|
|
Windows version
|
The version of Windows running on the workstation you are using.
|
|
Disk space
|
The amount of disk space available on your workstation for storing new data. This amount is only important if you have a large image library and the disk space falls below 100 megabytes.
|
|
Available keys
|
The number of "things" that FF&EZ can track in its database is determined by the number of unique keys (a simple, hidden integer used to link those "things" together) that can be assigned to each. The system starts with over 2,000,000,000 (2 billion) keys available and it is unlikely that you will approach this number in normal use of the system.
|
|
Data Location
|
This is the "path" to the FF&EZ data set to which this workstation is linked. This is set the first time a new FF&EZ workstation is run and is normally not changed. You can manually reset the data location (not normally recommended unless you need to temporarily access a backup data set) by clicking on the Change button to the right. If this is confirmed, FF&EZ will close and the workstation will require that a new link be established when you next run the program
Note: This only affects the current workstation in systems where the program runs on each, so a system-wide change must be repeated on each workstation.
You may also use this command if you are doing work for yourself as well as subcontracting work for another firm that also has an FF&EZ license. This lets you switch between two independent data sets.
In systems where FF&EZ is run as a shared application or on a terminal server, you cannot change the data location with the Change button. A system administrator will first need to delete a file used to control the path in this type of system.
|
|
Parent folder for temporary project images
|
When you click on the Select button on the Specifications screen to attach an image to a spec, FF&EZ initially displays a project folder that it has created beneath this folder. The default "parent" for this project folder is a folder named "Temporary Images" located in the FF&EZ-Import subfolder of your personal documents folder. The latter is what is normally displayed here.
Next to the folder are two buttons that allow you to either select a different default folder or reset the folder back to the default described above. You may want to change this folder if you have more than one person working on specifications for your projects and want to pool those images in a common folder structure on your server. Keep in mind that FF&EZ automatically creates the project folders for new projects; all you have to do is tell it the top-level folder where they will be created. That is, don't point to an existing project folder when selecting this parent.
All applicable users must have complete rights to any folder created for this purpose as well as its subfolders.
Note that if you change the location, any existing temporary image folders are not effected. If you want them to appear in the new location, you should move (cut and paste) the existing folders into the new parent folder. FF&EZ will also create a new, empty project folder if that does not exist yet in the current "parent" folder.
|
|
Temp files
|
The path to the location where temporary files created by FF&EZ's internal processes are created (these files are normally automatically deleted). This location is normally created and maintained by Windows itself, and may be useful for technical support to know if unexpected disk access errors ever occur.
|
|
Local settings
|
The path to the location where FF&EZ stores certain pieces of setup data, such as the "Data location" (above) and your workstation's private copy of the "views" it uses to access data in a multi-user system. Note: in server-based systems set up to access FF&EZ as a published application or via terminal server access, this folder is no longer active.
|
|
Location of executable
|
This shows the folder in which the FF&EZ program is located (not data).
|
|

