|
This approach to creating a design project breaks the project into two major tasks:
- Building the project room contents (and optionally, their budgets) while creating "placeholder" specifications needed for the objects.
- Detailing the specifications later after product selection begins.
Building your project in this way has three specific benefits:
- It reflects the natural process of deciding what is needed in each room, allowing you to focus on satisfying the functional requirements of the building before dealing with the details of specific product selections. That is, by building and viewing the lists of what each room needs to function (X number of chairs, a bed, X square feet of floor covering, etc.), you reduce the risk of leaving out an item.
- In building the list for any room type, you will more easily see the opportunities to create a "base" room that can be cloned to create variations, instead of starting each room from "empty." Using FF&EZ's various import and cloning commands can yield big time savings in projects with similar types of rooms (see Techniques for Building Rooms for more about this).
- At its most basic, this approach creates "placeholder" specifications. This means you have the option of detailing them manually or using the Edit> Import option on the Specification screen to import an existing, detailed product specification.
"Worksheet-oriented" actually refers to the first phase. The second phase is similar to the "spec-oriented" method, except that you will not be adding many specifications. Instead you will edit those you have created in the first phase, and these specifications will be already attached to the objects used in the rooms. All you need to do is use Edit on the Specification screen (or double-click a specification on the FF&E Worksheet's Summary area) to fill out the product details of those specs:
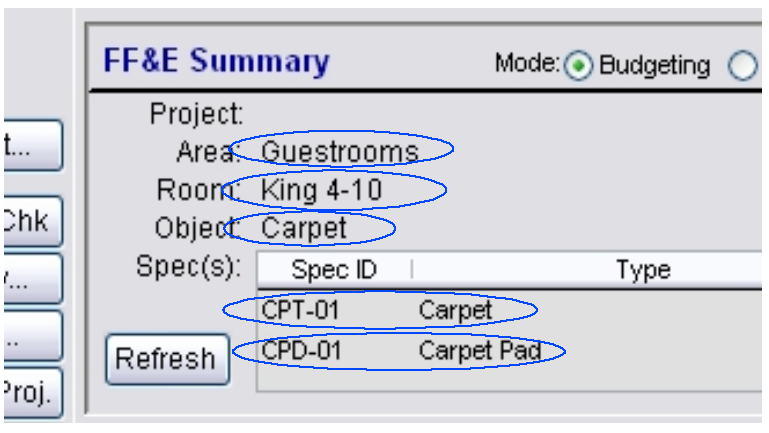
You can double-click any of the circled items to edit the source item on the related screen. FF&EZ will return you to the Worksheet when you save the changes.
Almost all of the work in this approach is done by starting from the FF&E Worksheet and allowing the system to automatically open the other screens as you need them. In fact, after entering the basic project setup information on the Project Form, you can create either a budgeted or fully detailed project for presentation from this one screen and print it.
There are only two common exceptions to using the Worksheet for creating the basic framework of a project: You copy a "base" room (with contents that are common to many rooms) by using the the Room List screen's Clone command or you can import a room and its contents using the Add> Import command on the same screen. Also, if you have created an empty room during a budgeting phase, you can use the Clone Into command to copy the contents of an existing room into another existing one.
The key is to understand how to use the data entry fields here. You will also find this easier to master if you have already familiarized yourself with the layouts and capabilities of the Object and Specification screens, since these will be called for you when needed.
Using Pick Lists
If you use the Worksheet's Add or Edit buttons, you will see the "Select area," "Select room," and "Object (tag) to place" pick lists, showing the current area, room and object (see image below).
When you use the Add button, they become your method of telling FF&EZ where to place an object you select from the object list (that is, to create an occurrence of an object in a room).
Similarly, when you use the Worksheet's Edit command, you can use the pick lists to either move the existing object to a new room or to replace the existing object with a different one.
Entering Room Objects - The Basic Procedure
First, be sure you understand the normal entry procedure: If you do not have to create any new areas, rooms or objects, entering data on the Worksheet is very straightforward:
- On the FF&E Worksheet, click Add. When the editing mode begins, you will see three pick lists used to select a location and the object to place in it, along with a display (on the right) of what is already in the room you selected. At the top right corner is a reminder of what operation you are doing.
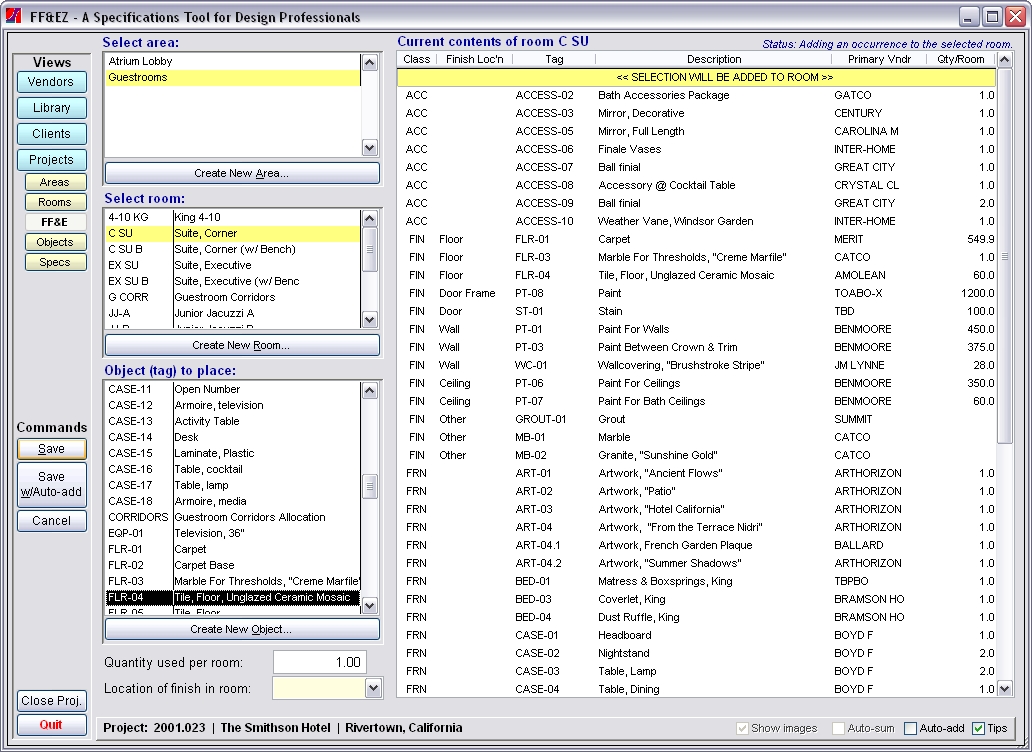
The three pick lists on the left are used to select a room to work in and to select an object to place in it, with the desired quantity entered just below. On the right is the current contents of the room, along with a highlight that either shows if a selected object is already in the room or if it will be added to the contents.
- Select an area (if needed). When you select an area, the rooms that are in that area will appear in the room selection list below it.
- Select a room (if needed). As you select a room, its current contents (if any) will display on the right.
- Select an object. When you do, the highlight in the room contents to the right will either move to that item (indicating that it already exists in the room) or it will move to the top line reading "Item will be added to room." If the object already exists, you can't add it to the room again (but you can cancel and adjust its quantity).
- Indicate the new object's quantity in the room.
- If the object is a finish, indicate its room location.*
- Click Save. That's it. However, if you plan to keep adding objects to rooms, click on Save w/Auto-add instead, so that this process keeps repeating until you are finished adding items (once activated, the "auto-add" version of Save won't appear again).
Note that at step 4, if you already know that an object will be placed with a quantity of 1 (the default amount), you can double-click the object and the entry will be saved with that quantity, skipping the other steps (this does not work with a finish, since the location within the room is also required). (This also works if you are editing an occurrence to change the object to a different one, but it retains the existing quantity.)
Dragging and Dropping: Not Needed
Although it is tempting to think that you should click on an object and drag it to the contents list on the right, this is actually a much slower way to work. In fact, the fastest way to add objects to a room minimizes the use of a mouse. There a several reasons for this that work together in making keyboard entry faster:
- It is slower to remove your hands from the keyboard, move the mouse cursor and then return to the keyboard to enter a quantity,
- When you are in a list, typing the first characters of an item will take you to that location in the list.
- You can use the [Tab] key to move between lists or you can press [Enter] after selecting an item on a list and the software will move to the next list.
- Simply highlighting (touching) an object on the list is all that is needed to tell the system you want to place it.
- On the Object pick list, you can press the [Enter] key to immediately move to the "Quantity used per room" field. Then, you simply add the desired quantity and use either [Ctrl-Enter] or [Alt-S] to save the entry. Better, if you have invoked the "Auto-add" option, the system will immediately return you to the object pick list to add the next item. Note that if you need to add a new object to the pick list so you can pick it, pressing Alt-O will display the Object List form in "Add" mode.
Creating New Rooms, Areas and Objects During Room Object Entry
If an area, room or object you need does not exist yet, you can add it "on-the-fly," using the Create New Area, Create New Room and Create New Object buttons below the corresponding pick lists. For instance (worst case scenario), if you need to add a new area, a new room and create a new object before you can place the object, here is the method:
- As above, select the Worksheet's Add function (use Edit instead if you are moving the current object to a new room or replacing it with a new object).
- If you need to create a new area, click the Create New Area button to display the Areas screen in "add" mode. Enter the ID (name) of the new area and any other information needed. When you click on the Save button on the Area screen the new area will be saved, and you will automatically return to the worksheet. The new area will appear in the areas pick list and it will be highlighted as the "current" area.
- Similarly, if you need to add a room, click the Create New Room button to display the Rooms screen in "add" mode. Enter the ID and name of the new room, select the area it is a part of (or create one if needed) and enter any other fields as you wish. When you click on the Save button on the Room screen the new room will be saved, and you will return to the Worksheet. The new room will appear in the rooms pick list and it will be highlighted as the "current" room.
- Finally, if you need to create a new object, click on the Create New Object button to display the Objects screen in "add" mode. Enter the Tag, Description, budget (if any) and Unit, confirm the automatic placeholder spec that will be created and add a secondary placeholder spec if desired (see the Object Screen for more about placeholder specs). Then click on the Save button on the Object Screen. Remember: Objects are generic "things" that will eventually be defined by non-generic specifications. When you enter the "Descr" field for a new object, enter a description that defines what the object is for ("Chair, occasional"), but we generally recommend that you avoid including references to where it is located (because this might change or you might use the object in more than one room). Remember that unless you choose otherwise, objects later use the description of the primary spec when you attach one to it.
- Here is an important point: Although you have added these new items to the pick lists you haven't added anything to the Worksheet list yet. So the last steps in this variation of the worksheet-oriented method are still steps 5, 6 and 7 in the main procedure above: Specify a quantity for the object you have selected, select a finish location* (if it's a finish) and then click the Save button. This last step is what places the object into the room.
Changing Existing Room Contents
In addition to simply adding new items, from the Worksheet you can change the contents of a room in one of four ways:
- You can change the current quantity of an object. This can be done directly on the Object List at the top by entering a new quantity in any row (entries that can be entered directly will be displayed in blue) or by using the Edit command to enter a new quantity for the currently highlighted row. When entering quantities, always include a decimal point so FF&EZ knows where the whole number portion ends.
- You can use Edit to change the room in which the object is located (that is, moving it to another room that does not already have that object in it).
- You can use Edit to change the object in the room to a different object (replacing the original object).
- The Replace command will replace usages of a highlighted object with another existing object in either all or selected rooms where it exists. This command can also be used to simply remove some or all usages of an object from the Worksheet.
In both the second and third options, you can use the Create New buttons to create a new area, room or object as part of your edit.
There are other powerful ways to build or manipulate room contents. These are covered in the Techniques for Building Rooms section.
Other notes
- Once you create an object, you can use it in any other rooms you wish. Don't try to create the same object more than once—it will already be on the pick list for you to select.
- When you begin to select products for the objects, you may find it useful to print an list of all objects needed and then work from that when you move to the Specifications Form. A report that may be particularly useful is the "Object Component Status List" from the Object List screen. It's twin, the "Specification Status List by Usage (Tag)," is available on the Specification List screen. There are other useful "status" reports on the same screen.
- You can also work directly from the FF&E Worksheet by double-clicking an item you want to edit in the FF&E Summary area at the bottom of the worksheet (not the main list above).
*If you select an object with a Class of "FIN," an additional field will be available on the form, allowing you to specify where in the room the finish occurs ("Floor," "Base," etc.). If you are going to use finishes (especially if you want to print Finish Schedule reports), always set the class of this kind of object to "FIN" when you create it.
|

