|
Quick Access Function Key: [F10]
This form displays when you select the Expediting view from the Views section. It includes fields and functions designed to make it easy to update the status of individual items from issued orders and note any problems.
Fields
Commands
Screen Options
Editing Forms (Overview)
Key Concepts
- Only items from issued, unclosed orders appear on this screen. The default sort order is by vendor and order number.
- If this screen is displayed after you open a project and then display just the project orders with the smaller Orders button, it will only display items from that project and its title will read "Project Expediting List." To restore the display of all order items, close the project first, then re-open this screen.
- FF&EZ treats each item as eligible for its own quantity, shipping and receiving status updates. This can be done individually for each item with Update Item Status or for the whole order (with each item updated with the same information or with their expected original quantities) using Update Order Status. When updating an entire order, previous updates for individual item fields are normally preserved, unless you use an option to override them.
- If you go to this screen when you are on the Orders List screen, its highlight will automatically move to the items from the highlighted order in the Orders list (if that order has been issued).
- You can quickly switch to this screen from the Orders List with the shortcut key [Alt-D]. The same shortcut will move to the Orders List from this screen. In both cases, the main lists will be repositioned to the current order (if you move to a different one).
- The same Processing function that appears on the Orders Screen is available on this one and performs the same functions.
- Whenever an order is closed, its items will automatically drop off the Expediting List and its associated reports, regardless of the individual status of those items (reports on the Orders screen have their own options to include or exclude closed orders). Best practice: Don't close an order until the project is finished, then use Processing> Close Orders.
- Each item displays a color-coded status (as they do on some reports). This is controlled by the "Delayed," "Shipped" and "Delivered" fields and (in the case of "Canceled") the shipped quantity shown. The status colors are:

"In progress" (no color) is the default for an ordered item with no further status entries. In addition, if an entered status date is substantially earlier than the current date and no follow-up status has been updated, the system will interpret that as a potential problem and flag it in red. For instance, if an ordered item was marked as "shipped," the system will expect a "delivered" date to be entered within a week of that date.
Expediting Fields
Shipping
|
Item shipping note/date
|
Used in "Status" column color coding. These are the same two fields from the Item Form that can be used to indicate an item-specific shipping schedule. There is also a separate note and date for each shipping split that is created, so that spur-of-the-moment holds and partial shipments can still be scheduled. Once an item or split has been marked as "shipped," these fields display as read-only. For the date portion, you can use the date shortcut keys to advance or roll back the date, or double-click for a calendar.
If you enter a specific note/date on the Orders screen, it will apply to all items in the order where those fields on the Expediting screen are blank.
|
|
Internal?
|
If you put a check in this option, the information you enter in the "Item ship'g note/date" fields for this item split will not appear on the orders, but will appear on recap or status reports. The expediting reports have a report option that allows you to suppress internal shipping notes if you send them to a client, and if you do this often, you may want to use the Save Report Options feature on the Report Setup screen to create a saved variation.
The order-wide shipping note and date on the Order screen are not affected by this option and will continue to appear on the order's page header if you use it.
|
|
Vendor Ack
|
Use this field to enter the vendor's acknowledgement code. Note that since these usually apply to the entire order, you may wish to use the Update Order Status command instead of entering this on individual items.
If you often record a temporary "acknowledgement" (such as a representative's name for a verbal one), you should use Update Order Status to record the formal code later. This has an option allowing you to override existing entries.
|
|
Will Ship
|
Used in "Status" column color coding. If the vendor has promised or indicated a date on which the item will be shipped, enter it here. This field appears in a number of status reports, including the "Projected Shipping / Funding" reports used to predict shipping activity and cash needs. If the date applies to an entire order, use the Update Order Status command to enter it on all items.
|
|
Delayed
|
Used in "Status" column color coding. You can use this flag field to indicate that shipping for this item or split is "delayed." This can be used with or without an entry in the "Will Ship" field. Status reports will show either "Delayed" (only) or "Delayed" plus the "will ship" date. For status purposes, the "Delayed" flag is ignored once a "Shipped" or "Deliv'd on" date is entered.
|
|
Shipper
|
If you have tagged vendors in the Vendor List as being "Shipping" vendors, they will appear on this pick list for use as the shipping line. If you need to add a new shipping vendor, use the New button next to this field.
|
|
Pro #
|
Use this field to enter the shipping vendor's code for the item being shipped.
|
|
Shipped on
|
Used in "Status" column color coding. This is the actual date of shipment. You can use the [+] and [-] keys to advance or roll back the date, or double-click for a calendar. When you first enter this date, the system will pre-fill the "Qty shipped" value for you.
If the "shipped" date applies to an entire order and no quantities changed, use the Update Order Status command to enter it on all items.
|
|
Qty shipped
|
Enter the actual quantity shipped. This field is not enabled unless a "Shipped on" date is entered.
If the quantity you enter differs from the expected quantity for the item / split you are updating, the "If shipped qty differs" section (see below) is enabled to allow you to account for the difference.
You can enter the default "Qty shipped" value for all items on an order (or all unshipped items) by using the Update Order Status command (see under "Expediting Functions" below).
Once the item has been processed on a document using Enter/Reconcile Vendor Final Invoices, Issue Vendor Balance Requests or Print Client Balance Invoices, a non-zero "Qty Shipped" value can only be changed by entering a lower quantity and creating a shipment split, or by creating a new adjustment line item. If you split the documented "shipped" quantity, the financial charges in the original and new splits will reflect pro rata amounts based on the two quantities. However, deposit and payment amounts will still be applied on a "first come, first paid" basis so that any net balance falls on one line item.
|
|
Container #
|
When an order is shipped, you can record the ISO container number in this field. The ISO 6346 format has this pattern:
OOOT999999C
O= Bureau International des Conteneurs Owner code
T=Type
9=Owner's serial number
C=Check digit
Example: ABCU1534568
In FF&EZ, a visual separation is automatically used between the major sections (ABCU 153456 8) to make it easier to read�do not enter any spaces yourself. The system checks the entry against the basic rules for the ISO format. This includes verifying the check digit.
|
|
If shipped qty differs from original...
|
If the shipped quantity you enter is not the same as the expected quantity for the current item, you must account for it either as a split shipment (if less than expected) or as a quantity variance (normally this is for a quantity that is more than expected, but you can also use it when a final shipment is a shortfall.) A variance quantity is noted and saved if you choose the first option, and represents the portion of the total shipped quantity that differed from the original order.
A shipping variance represents a change from the quantity ordered (this is the quantity on the Item editing screen). This is not the same as a partial shipment that will be balanced out by a later shipment (a shipping split). You can control whether a variance amount affects the extended sell price or the purchasing fee amount. See the next entry.
|
|
Adjust client amount/fee?
|
This is used to override the project setting for how quantity variances are billed to the client. This only affects the amount billed to your client by you. It does not affect the check request amount to a vendor. If this is unchecked, the unadjusted original quantity will be used in calculating an invoice to your client.
This field has no effect if you have pre-billed an order (unissued or issued), since the billing amount cannot be changed at that point. This can be resolved by entering the original quantity and then separately creating a new special item on the order to handle the difference.
|
|
New Ship Date
|
Used in "Status" column color coding. If you use the "...create a split" option, FF&EZ will create an item split for the balance of the original quantity after the update to the current item is saved. Before you save, you have the opportunity to specify a new promised "Will ship" date (as described above) for the new item split. No variance is recorded .
|
Delivery
|
Est. Delivery
|
This date field is used to record your (or the vendor's) estimated date of delivery. This will appear on "Expediting Status" reports. If the date applies to an entire order, use the Update Order Status command to enter it on all items.
|
|
Deliv'd on/as of
|
Used in "Status" column color coding. Use this field to record the date the FF&E was received. You can also use the field as a simple flag by entering the date that receipt was confirmed. If the date applies to an entire order and no quantities changed, use the Update Order Status command to enter it on all items.
|
|
Recv'd to date
|
Enter the amount received. If the amount is less than that shipped, you can enter an explanatory note or allow the system to generate a generic one. If missing items are eventually received, you can simply update this field to reflect the total.
|
|
If received quantity is different from shipped
|
FF&E will add an automatic note or one you write yourself to the general PO notes field if the "received" quantity you enter is less than expected.
|
Status Column
In the list section of the Expediting screen, the "Status" column gives you quick feedback on each order item if you consistently update the status fields with the Update Item Status and Update Order Status commands.
If you do not enter status updates, you may see only "N/A" in this column. Note that the "Shpg Date" to the left of the "Status" column is the requested shipping date (which may be modified by the shipping "Note" associated with it).
The color coding you see has these meanings:
|
Background color:
|
|
Orange
|
The item is delayed (set by selecting the "Delayed" option in the "Shipping" section of the screen). This may include a "will ship" date from the vendor if one has been entered. The "delayed" status is ignored (and normally cleared) when a "shipped" or "delivered" date is entered.
|
|
Green
|
The item has been marked as "shipped."
|
|
Blue
|
The item has been marked as "delivered."
|
|
Grey
|
Item was marked as "shipped" with a zero quantity (this might happen if a missing quantity was cancelled as a "100% variance.")
|
|
Text format:
|
|
Bold red
|
Used where any of these conditions apply:
- Late ASAP item: The item's "shipped" (or "delivered") date has not been entered where an "ASAP" shipping note has been entered and the current date is a week past the "Issued" date.
- Requested critical shipping date has passed: No "shipped" or "delivered" date has been entered and the current date is at least 3 days past a date entered in the "shipping note / date" section.
- Vendor's promised "will ship" date has passed: No "shipped" or "delivered" date has been entered and the current date is past the "will ship" date from the vendor.
- Possible delay in transit: A "delivered" date has not been entered and the current date is a week past the entered "shipped" date.
|
Correcting Shipping & Delivery Entries
FF&EZ's has a "preference" for entering expediting information in a logical way, which means that it expects you to enter a "Shipped" date for an item first, then either accept the default quantity or enter the "actual" shipped quantity and follow the options that result from this. This unlocks the "Delivered" section's fields.
For this reason, if you need to correct shipping and delivery quantities, you should change them in reverse order: Set the "delivered" quantity to the corrected value (or zero) and if you are removing the values, blanking out the delivered date. At this point, you can make similar changes to the "shipped" values above. If you blank out the "Shipped" date, the system will reset the quantity shipped, also.
Financials
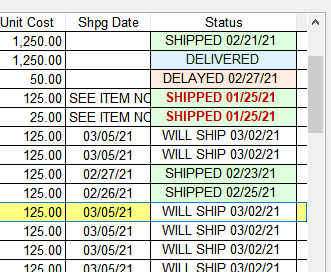
The Financials section can display either the values that apply to the currently highlighted order item or to the entire order. The display you see is controlled by a checkbox at the bottom of the Expediting screen.
Item Financials
In the main image above, the "Item Financials" can be seen.
Under normal circumstances, all of the following fields are updated through the processing functions, not by manual entries. It is also possible to void either a balance request or an invoice (as long as payments have not been applied) to return order items to "unrequested" or "uninvoiced" status by using the Void functions on the Requests List or Invoices List screens.
|
Deposit status
|
(Applies to whole order) If a deposit request has been issued, its request number will be displayed. If the deposit has been recorded as received, the deposit amount will show instead.
|
|
Balance request
|
(Applies to current item) If a balance request has been issued that included the current item, its request number will be displayed. If the amount has been recorded as paid, the amount will show instead. You can double-click this field to go to the request in the Request List (unless the Request List form is already in "editing" mode).
|
|
Our invoice
|
As above, if you have issued an invoice (for either a "sell price" or purchasing fee) for the current item, the invoice number will be shown and if paid, the amount. You can double-click this field to go to the invoice in the Invoice List (unless the Invoice List form is already in "editing" mode).
|
|
The fields below are calculated and updated automatically by the Processing> Enter/Reconcile Vendor FinalInvoice command. For any given item or item split, the system will allow you to apply two vendor invoices: A final invoice for any balances owed for any of these fields, and a second invoice for any remaining shipping amounts. This is normally done for all items or all shipped items on an order (depending on what is actually on the vendor invoice). If a vendor invoice is entered incorrectly or is found to be wrong, you can use the Update Order Status command (see below) to clear all of an order's vendor invoice entries.
Final vendor invoices are those that a vendor sends after all shipping is complete, confirming final quantities. These sometimes include final freight amounts or (for some product types) overruns that are variances. In contrast, vendors may send deposit invoices prior to any shipping. These are handled on the Orders screen in the Vendor Deposit Requirements section. However, all orders must be reconciled, so the last deposit invoice may be later processed as a "final" invoice for a 100% pre-paid order. That information will appear here as well.
|
|
Vendor Invoice #
|
The invoice number or document ID from the vendor's first invoice for the current item.
|
|
Invoice date
|
The date of the vendor document.
|
|
FF&E amount
|
The gross FF&E amount invoiced by the vendor for the item.
|
|
Total tax amount
|
The tax on the item (note that this will be a pro rata amount from the total on the invoice).
|
|
Freight invoice #
|
If freight on this item was invoiced separately, this will contain the ID from the invoice.
|
|
Invoice date
|
The date of the secondary invoice.
|
|
Total freight amount
|
The tax on the item (note that this will be a pro rata amount from the total freight on the invoice). Note that this field may be updated as a result of entering either a primary invoice or a freight invoice, so the "Freight Invoice" number and date fields may be blank.
|
|
Deposit applied
|
The total amount of the order deposit applied to this item.
|
|
Paid to vendor
or
Item Balance due
|
This calculated field shows one of two things:
- If the item has no balance, it shows the total paid to the vendor, including any deposit that was applied. This displays in green.
- If there is a balance due on the item, this is displayed instead.
|
Order Financial Summary
This section of the screen is displayed using the option button at the bottom of the Expediting screen, which toggles between this display and the "Item Financials" version. You can also switch between them by right-clicking on the title at the top of the section or by using the [Alt-W] hot-key.
The Order Financial summary gives you the current totals for the original order quantities and costs, the order deposits and balance payments for both client deposits (to you) and vendor deposits.
Expediting Functions
|
Update Item Status
|
This function is basically an "Edit" button for the item's status fields and behaves just like the regular Edit button. You can use it to enter any of the shipping status information for the currently highlighted item.
Like other editing functions, when you are finished with your entries, you click on a Save button to save them. However, you will also see a Save & Close Order option, which will save your entries and attempt to close the order itself. If any items have unresolved shipping, receiving or billing amounts, you will be asked to confirm if you really want to do this.
Additionally, if you enter a "Shipped" date and a shipped quantity that differs from the original, the system will ask you to account for the difference. If the quantity is less than anticipated, you can choose to create a split shipment to allow for normal differences that occur when shipping must be staged for larger projects.
Conversely, if you enter an amount greater than anticipated (or less than and you choose not to use the "split" option), you can account for the difference by selecting the "variance" option. The system will record the shipped quantity you enter, but will also record the difference in a variance field for use in reports.
|
|
Update Order Status
|
This function is similar to the one above, except that it operates on all or selected items in the order. You can limit the affected items by either 1) selecting or unselecting items as needed within the command or 2) by using a query prior to calling the command.
The update also skips any fields already filled unless an override option is used. When you click on this button, a pop-up form will appear that allows you to enter a value in any of the shipping status fields. For details, see the full Update Order Status topic.
|
|
View Item
|
You can use this function to display the item screen in "view" mode, which does not allow any changes.
|
|
Revise Item
|
This function displays the Item screen in "editing" mode and allows changes unless a particular field is involved in shipping or billing activity that has already occurred. Note: Changes to an item caused by shipping variances, discrepancies or changes on vendor invoices are handled in the Processing function or with the Update Item Status function (above), not by directly editing the item with the Item screen.
Shipping splits and quantity variances should not be entered with the Revise Item function. Always use Update Item Status instead. This allows the system to compare differences between the original order quantity and the actual quantity shipped.
|
|
Unsplit Item
|
This command is used to merge the last split created for an order item and the "parent" split from which it was created. This is primarily used to correct a split that was created by mistake. For instance, if you meant to enter a final under-shipment variance, but created a split instead.
Since the ability to "unsplit" or recombine data depends on what other changes have been made to the two parts, it is important to understand that there is a limited window in which the command can be used. Here are the rules:
- The command only works on the last split pair. So if you have splits numbered 2, 2.1, 2.2 and 2.3, it will only "unsplit" 2.2 by merging 2.3 back into it.
- To start the command, highlight the item you plan to "unsplit," which is the "parent" of the pair. In the example just above, you would highlight split 2.2, not 2.3, prior to clicking on the command button. 2.2 was the line that was originally split, so it is also the one that will be "unsplit."
- The command is not available if either of the pair has been updated by a vendor invoice, check request or billing invoice. The button will be disabled.
- Since this is an error-correction function, it merges the two splits and leaves them with an "unshipped" status. This includes removing any variances, so be sure to note the quantities involved if you need to re-enter them. You can then make any corrected shipping status updates as needed.
- Chaining the command: Once you merge two splits, you can unsplit the one above the original "parent" as long as the rules above allow it.
|
|
Processing
|
This is the same function that is available on the Orders List. A full description can be found under Processing Tools.
|
Screen Options
Unless noted otherwise, these options typically appear in the lower right corner, on the status bar.
|
Show Order Financials
|
This option switches between a display of financial values for the current item and those for the entire order. These appear on the right side of the screen.
You can also cycle through these blocks using the [Alt-W] shortcut key combination or by right-clicking on the title of the block.
|
|
Tips
|
The "Tips" option controls whether or not you need "fly-over" help or hints when your mouse cursor hovers over a control or a field. This can be extremely helpful for new users, since these explain the purpose of the item and may list shortcut keys that can speed up simple operations.
|
|

