|
Processing Function List
Typical Fields
Processing Tool Usage
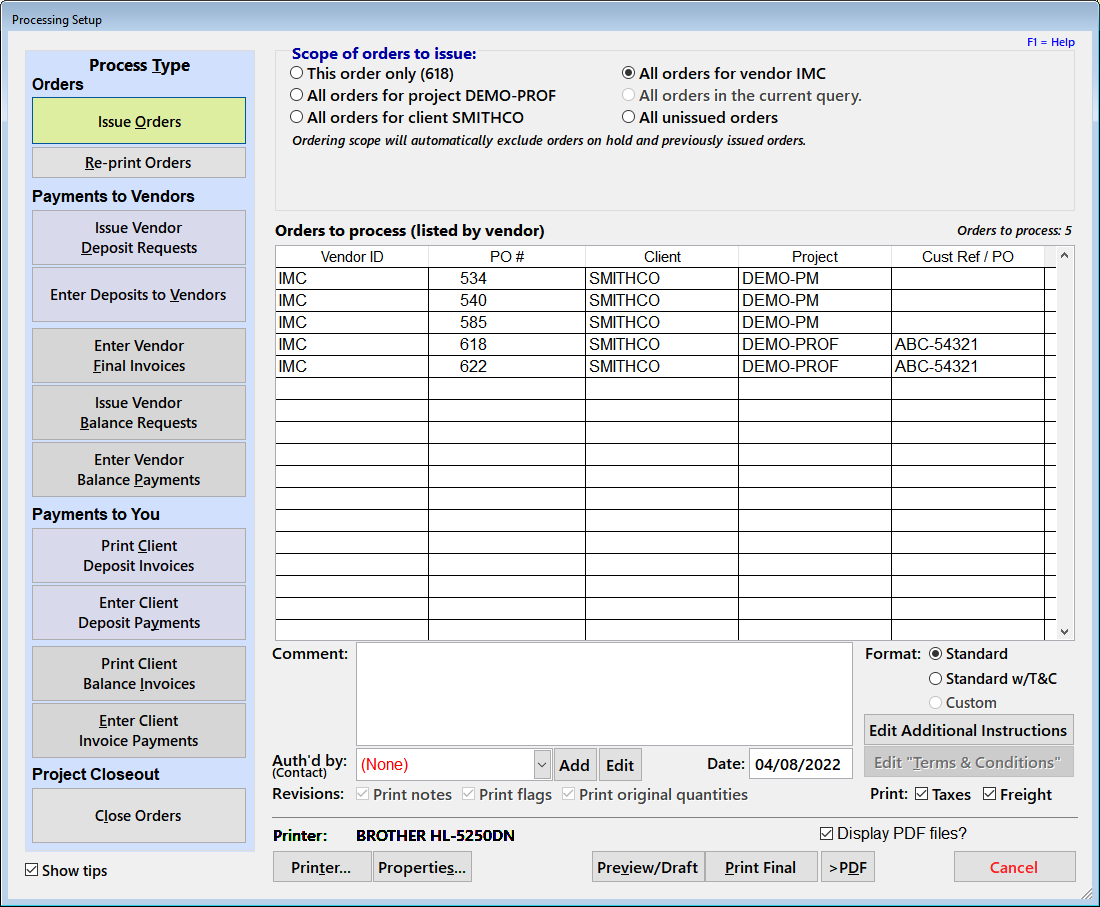
This form is available on both the Orders List and the Expediting List forms. It is used to perform all major order processing tasks, such as issuing orders, re-printing previously issued ones or processing the "downstream" documents that are received or generated as a result. Generally, any activity that can affect many orders or many items at one time will be found on this form.
There two exceptions to the above: 1) shipping and receiving status are handled on the Expediting List screen for status updates that occur before the vendor sends an invoice, and 2) specific types of corrections and reversals of status are handled by different functions. See: Reversing Status Milestones).
For-profit and simple purchasing fee projects will use the invoicing related functions more often, while full-blown purchasing management projects will tend to use the vendor invoice and check request functions as much as the others. It is important to realize that purchasing management can be done for internal "clients" too, so functions like deposit requests can be used as the documentation for inter-departmental procedures (see table below for comparisons of different approaches).
Types of Processing Tools
Creating Documents
Although each processing type has its own specialized controls, those that involve creating documents to send to others include several recurring sections:
- A way to set a scope of orders or items to process, including options to narrow the scope based on status.
- A resulting list of eligible orders or items that can be reviewed prior to processing
- Miscellaneous options that affect the format of the resulting document. This includes temporary notes, permanent "boilerplate" notes and the document date that will be saved when the document is created with the "Print Final" option (see next).
- A Preview/Draft button to allow you to preview documents on screen or print appropriately noted draft versions. The preview toolbar includes the ability to save a draft copy to a PDF file.
- Print Final and [>PDF] ("print final to PDF") buttons to print the final documents and update any data changed as a result (for example, setting an "issued" date for orders). On some document types, you also have a Record (Only) option to create the final document without generating a "printed" version.
Whenever a Print Final button is part of a processing type, you will be asked to confirm that the documents printed correctly before the data is updated. DO NOT distribute documents where this last prompt is not confirmed. On multi-user systems, always respond to this prompt as soon as possible.
Processing Received Documents
Similarly, those functions that involve processing documents that you receive also have similar elements:
- A place to record the document number (e.g., vendor invoice #, customer check #) and date.
- Fields to record the amount(s) on the document. These will differ depending upon whether you are distributing payments or reconciling invoices to your orders and their items.
- A button to apply or accept the entries you've made.
- In cases where a discrepancy occurs and you do not wish to cancel and request a corrected document, a "debit" or "credit" memo can be printed to document the difference. These memos can be used outside the system as part of a correction process or entered later as a continuation of processing the original document (in the case of a balance that can be applied when new items become eligible).
Note that some received documents can be entered directly on the Orders screen instead of using a Processing tool. Examples include vendor pre-payment or deposit invoices. The tools make it easier to process multiple items or documents. These options are covered in the Purchase Order Workflow: An Overview and Deposits: An Overview sections.
Reprinting Documents
All "created" documents except for purchase orders can be reprinted on the screens where they are managed after creation, that is, the Invoices List and Check Request List screens. Purchase orders can be reprinted using the Processing function's Re-print Orders command, which can be used with the same scopes and Orders screen queries available when issuing orders.
The Processing Functions
In addition to this brief introduction, a table later in this section has an explanation for how each tool is used in different billing or project type scenarios. The table includes links to the full procedure for each in the "Purchasing: How to..." section.
The functions are grouped on the screen according to basic purpose.
|
Orders
|
|
Issue Orders
|
Use this function to officially issue orders to vendors. The orders will be date-stamped as being "issued" and the automatic revision system will be enabled for them. For any given scope of orders, you can set the original "Issued" date to be a date other than the current one.
|
|
Re-print Orders
|
This simply reprints the orders, using similar scope options as are found when issuing orders (although technically not a "processing" function, the scope options make re-printing orders easier compared to the standard report setup).
|
|
Payments to Vendors
Deposits to Vendors
These functions are optional if you don't need to print deposit check requests or are using credit cards to pay deposits directly. However, be sure to enter all deposit information and deposit payments on the Order screen under "Vendor Deposit Requirements." If you don't, vendor payment reports will not show the correct amounts paid. Deposits are usually based on some percentage of the order cost (not the sell price).
|
|
Issue Vendor Deposit Requests
|
Once you have entered a vendor's deposit requirements on the Order Screen, you can use this function to print check requests to customers to send deposit amounts to a vendor (full purchasing management). If your projects are internal or are billing type 1, the check requests can act as an internal memo to your accounts payable for the same purpose. This function includes the Record (Only) option that allows s single users or small offices to record the document as an audit trail without printing it or generating a PDF.
|
|
Enter Deposits to Vendors
|
Use this function to enter the check information and amounts of deposits sent to a vendor. This is provided to handle deposit checks that cover more than one order. For most orders, it is easier to record deposit payments directly on the Orders screen.
|
|
Vendor Balances
These functions are required to properly reconcile vendor invoices against the original orders and to document final payments needed and paid. This includes orders paid with a 100% deposit�deposits are not applied until you confirm that the quantities and charges are correct with these functions.
|
|
Enter/Reconcile Vendor Final Invoices
|
This processing function allows you to reconcile a vendor's invoice to the expected charges for FF&E (that is, the product), tax, freight and deposit amounts to apply. After entering information about the vendor invoice and the order to which it refers, the system will display the "expected" totals for the invoice, which will normally match what the vendor is showing.
Important: Always enter the amounts shown on the invoice if they are different from the "expected" amounts (unless you are only being invoiced for shipping for a pre-paid order � see "Low Information Invoices" for more). The system provides tools to help you reconcile these differences, so it has to know what those differences are.
|
|
Issue Vendor Balance Requests
|
Once a vendor invoice has been entered and accepted, this function will print a balance check request to customers for the outstanding item amounts for each PO, using scope options similar to those for issuing POs (full purchasing management projects). As is the case for deposit requests, balance requests that you issue can be reviewed on the Check Requests Screen. This function includes the Record (Only) option that allows you to create the document without printing it or generating a PDF.
|
|
Enter Vendor Balance Payments
|
When a balance payment is sent to a vendor (or you are notified of this, depending on the billing type), you can log it against the balance request using this function. After entering information about the check, the system will display outstanding balance requests for you to select and credit.
|
|
The processing milestones created by these functions can be reversed if needed, but this must be done in a orderly way that does not violate the data integrity logic that prevent mistakes. This is covered in the "How to" section Reversing Status Milestones.
Payments to You
These functions deal with your own charges to your clients, whether invoicing the sell price when using markups or when invoicing per-item fees based on a percentage of cost. These are not typically used for fixed fee projects, since those are more easily invoiced from your accounting system (however, this type of invoicing can still be done in FF&EZ).
Important: Deposits and balance amounts are handled differently, so be sure to use the correct functions. Deposits are held in the system until the balance invoice is generated, at which point they are applied to the invoice items until they are exhausted, leaving the net balance owed by the client.
Client Deposits to You
These two functions are used on for-profit / resale projects (billing type 1) when you require that your client make a pre-payment to you before you issue or confirm orders to a vendor. The deposit is based on some percentage of the sell price.
|
|
Print Client Deposit Invoices
|
This can be used to create invoices for a deposit or pre-payment amount owed to you (not to a vendor), which is set up on the Orders screen (see Client Deposit Requirements). The format of the deposit invoice is similar to that for the existing client final invoice, but shows the required deposit as the amount owed.
FF&EZ's standard invoice formats have an "invoicing backup" format option (chosen in the invoice setup before printing) that re-titles the document as "Invoicing Detail" by default and changes the label "Invoice #" to "Document #." This allows you to issue a numbered, simpler invoice from your own accounting system and use the FF&EZ "document" as backup detail.
|
|
Enter Client Invoice Payments
|
This is an optional function, used when a client's deposit check covers more than one deposit invoice. To use it, you enter the basic information about the payment, then select all deposit invoices to which it should be applied.
This is not used often, since deposit invoices tend to be based on a deposit for a single order. When that is the case, the easiest procedure is to edit the order on the Order List and enter the payment information in the "Client Deposit Requirements" section.
|
|
Client Final Payments to You
|
|
Print Client Balance Invoices
|
This function is used to print an invoice to your client for either the FF&E "sell" price or for your fee. The presence of the purchasing fee % on the order is what determines the kind of billing that occurs. In order for an item to appear on an invoice, it must meet certain scope and status criteria. The latter defaults to "shipped," as entered on the Expediting screen. This status represents the most earliest accurate quantity numbers you can invoice, minimizing later problems that have to be corrected.
FF&EZ's standard invoice format has an "invoicing backup" format option (chosen in the invoice setup) that re-titles the document "Invoicing Detail" by default and changes the label "Invoice #" to "Document #." This allows you to issue a numbered, simpler invoice from your own accounting system, and use the FF&EZ "document" as backup detail.
You have the option of invoicing orders that have not been issued, but this must be done with care.
The normal assumed procedure is that clients will pay in advance based on one of three options: 1) the FF&E Worksheet's "Quote/Contract" report format, 2) on a client deposit invoice you have issued (see above) or 3) based on a "% of completion" process in an external accounting system. Client invoices normally depend on verified final quantity numbers, so issuing a numbered invoice before the rest of the expediting and vendor reconciliation process will limit any invoice changes or corrections to adding special item types to the order and processing those in the regular way on a separate invoice.
|
|
Enter Client Invoice Payments
|
This function is used to record payments from your client against outstanding your invoice amounts. Since you may prefer to handle all invoicing on your own accounting system, this is provided as a convenience but may not be used in most situations.
|
|
Project Closeout
|
|
Close Orders
|
You can close individual orders with the Edit command on the Orders screen and with the Update Order Status command on the Expediting Screen. However, if you avoid closing orders until a project is totally finished or wish to simply close all remaining orders at that point, you can use this command to close multiple orders in one step.
|
|
The table with detailed usage information can be found here.
|
Processing Form Fields and Controls
Document Production
Here are the common fields and controls on this form for functions that produce documents (e.g., issuing orders):
|
Scope of (item type) to (process type)
|
This label will change, depending on which processing function you selected. The scope options are fairly straightforward: Just select the option that matches the group of items you want to process. Note that if you select a Process function while you are on an order that cannot be processed (e.g., you are issuing orders and it has already been issued), the system will attempt to use a larger scope and if unsuccessful, will display a note that no orders match the default scope (which is to process only the currently highlighted order). The "All [items] in the current query" scope will not be selectable unless you have a query active on the Orders Form.
|
|
Processing Status scope
|
This option can be worded in different ways depending on the type of processing, but allows you to narrow or expand the items to be included based on a processing milestone. For example: "Process only items that have been:"
Typical status milestones are:
Not Issued
Issued
Shipped
Delivered
Not all of these will apply to a specific processing command.
|
|
(Processed) from (date) through (date)
|
Some commands give an option to additionally limit what is processed (or re-printed) to items within a certain date range (such as the "Issued" date). In addition to being able to enter the dates directly, the usual options are available to use the + and - keys and to double-click to display a calendar.
Some forms of this type of control also have a "quick set" button that automatically sets standard date range, such as "month-to-date," "last month," "year-to-date," etc. Each time you click this button, it sets the range shown on its caption, but also rolls forward to the next possible option. To set any particular range, simply click the button until the range you want is set.
If you enter a "from" date that is later than the current "through" date (or vice-versa), FF&EZ will switch the dates to preserve the proper meaning of the option.
|
|
Process items with no billing amount?
|
(Invoice function only) When issuing or re-printing invoices, you can control whether orders items that have no billing amount are processed and whether they appear on the invoice.
You may or may not wish to invoice order items that had no sell price or which had no fee associated with them. Including them is the normal choice, since it is better for those items to "process out" of the set of uninvoiced items in the system. This option allows you to exclude those items if there is a reason to avoid processing them at the time you create the invoice. The default is for this to be "selected."
If you change this setting, the display of eligible items will update to reflect it.
|
|
Print on invoice?
|
(Invoice function only) If you allow the "no billing amount" items to be processed, they will still not appear on the invoice unless you also select this option. In that case they will be marked as "no charge" to avoid confusion. The normal setting is to not print them, since this situation is most common in for-profit projects where secondary object components are ordered with a cost but their "sell" price is incorporated in the sell price for the primary object component.
|
|
Comment
|
The comment field appears on some formats, usually in the header area, and can be used to add specific but not necessarily permanent instructions or contact information. The comment you enter for a particular type of processing will stay in effect until you close the Orders Form. Note: For longer, permanent notes and lists, see "Edit Boilerplate" below.
|
|
"Auth. By"
|
This dropdown field will pre-print a name in the signature line on some formats and is useful for orders that will be printed as PDF files. The name you select here may also be used as the "Contact" on formats that display a contact name, phone and email address. You can enter these items using the Edit button next to the field or with the People button on the Setup screen (accessed from the FF&EZ opening screen).
To use it, you simply select from the list of employees or contacts maintained on the Setup Screen (but which can be added or edited directly from this window).
On purchase orders, this name is saved to the order so it can be available for re-printing the order. On some formats, this field will change to "Revised by" so that a different name can be substituted on a revised version of the document. This name is not saved and the original authorizer is always retained.
|
|
Date
|
This is the "official" date of the document, which will be saved when you print the document using the Print Final option (below). The date always defaults to the current date, but you can change it if needed (it will display in red if you do as a visual reminder). Once a document prints successfully (or set of them if printing a larger scope) the date will be reset to the current date to avoid accidentally misdating others that you might print. (Note that all documents will display the original date when they are reprinted.)
|
|
Format
|
If you have purchased a custom document format, this option will default to "Custom." Otherwise it will automatically be set to the standard format and "Custom" will be disabled.
|
|
Edit "Notes" Boilerplate
|
This option brings up a subform that allows you to enter "typical" notes, instructions or disclaimers that will automatically appear on every document you print. There is a separate entry for each processing type that uses this field, as well as for standard and custom formats.
Please note that, unless you have a custom format, boilerplate on orders, invoices, etc. is assumed to be of reasonable length (10 to 15 lines). Longer boilerplate entries may create awkward-looking sections at the beginning or end of a report and a custom report may be a better solution in those cases.
Also note that the boilerplate text for a custom format is separate from that for a standard format.
|
|
Print Tax
Print Freight
|
(Issuing and reprinting orders) These two options control whether the standard purchase order format prints the total expected taxes or freight at the end of the order. These numbers come from the order screen, using either the estimated tax calculated from the tax % or the tax quote and using the freight quote value. If you change these options, your setting will remain in effect until you close the Orders List screen. The amounts are based on the order cost not any sell price (if applicable).
|
|
Revisions
|
(Reprinting orders) These three options control the content of revised orders when you re-print them (they are disabled when issuing new orders).
Print Notes
This controls whether the automatic revision notes are printed just below the order's header area.
Print Flags
This controls the highlight and short note that appears on a revised item to indicate that it has been revised (at this writing, this refers only to order items).
Print original quantities
If the actual shipping quantity was different from the original, ordered quantity, this allows you to control whether the order only prints the original quantity.
If you change these options, your setting will remain in effect until you close the Orders List screen. The options apply only when re-printing orders.
|
|
Invoicing backup format
|
(Invoice function only) This option changes some of the labeling on the invoice to make it more suitable for use with an official invoice created on your accounting system. The document will be labeled "Invoicing Detail" instead of "Invoice" and it will display a "document number" instead of an "invoice number." Also, the "Remit to" block will refer the reader to the official invoice for this information to prevent any confusion between the two systems.
|
|
Preview/Draft
|
This button will display the standard print preview window, from which you can click the Print button on the floating menu to print a draft copy of the documents in your scope. Important: When viewing drafts, each "document" (order, invoice, etc.) is a separate report. If you close a preview with the "Exit" icon on the preview toolbar, the next document will be displayed. On the other hand, if you press the [Esc] button, FF&EZ will ask you if you want to cancel the preview.
|
|
Record (Only)
|
This option is only available for the Issue Vendor Deposit Request and Issue Vendor Balance Request commands. It performs all the "final" processing that is part of the Print Final and [PDF] commands (below), but does not produce a document. The purpose is to allow you to quickly mark vendor invoices as "processed for payment," so that reports can reflect this. This is useful for projects where you are paying vendors as an "agent" of your client, and a physical or PDF check request isn't needed.
Using this option allows you to use the Check Requests screen's "Check Request List" report and include all invoices that have been processed for payment (paid or unpaid) during a specific time window. If you later need a physical copy of a check request, you can "reprint" one from the main Check Requests screen.
|
|
Print Final
|
This button prints the final version of the documents, cycling though each document that is produced by the selected scope of items. Once each document has been processed, the system will ask you to confirm that they printed correctly. If you answer "yes," all the printed items will be marked as "processed" (e.g., with an issue date or with numerical balances updated). If not, they will be left unchanged so that you can resolve any printing problems and try again.
Since FF&EZ is an "active" database system, we suggest that you always print final documents like purchase orders as PDF files. Otherwise, subsequent changes to related data such as names, addresses or boilerplate content may make it difficult to re-print the original document exactly as it was printed.
|
|
>PDF
|
Like Print Final, this command prints the final version of the documents, but sends them directly to PDF files. An automatic folder destination and name is supplied, but you can override these as you would when using a PDF printer. In a similar way to Print Final, it cycles through the documents being produced, so you may see more than one prompt for a file name.
Next to this button you will see a "Display PDF files" option. If this is checked the system will attempt to call a PDF viewer. If you are printing multiple documents and do not wish to see them all displayed or if you are working on a server that has no viewer, uncheck this. It will retain your setting for the duration of your FF&EZ session.
|
Document Processing
These fields are typical for most functions that are used to process incoming documents (typically, vendor invoices and client checks). Depending on the type of document you are processing, not all of these will be displayed. For instance, entering a purchase order number automatically links to the order's project, client and vendor.
|
Project ID
|
Selecting a project ID will limit the display of eligible items to those in the specified project.
|
|
Client ID
|
Like the Project ID, this field is used to limit the display to items for the selected client. If you enter a Project ID, this field will be automatically set to the client for that project.
|
|
Vendor
|
Selecting a vendor will limit the display to items for that vendor, as well as cross-check that any Po's entered are from the correct vendor.
|
|
Invoice #
|
The document number from a vendor's invoice. In many cases, you can enter "P" and this will be converted to "Proforma" when you move off the field.
|
|
Invoice Date
|
The date of the vendor invoice. You can use the [+] and [-] keys to advance or roll back the date, or double-click for a calendar.
|
|
FF&E
|
The total FF&E shown on the invoice (this is the gross amount before any credits for deposits paid).
|
|
Tax
|
The total gross tax shown on the invoice.
|
|
Freight
|
The total gross freight shown on the invoice.
|
|
Deposit
|
The total deposits credited by the vendor on the invoice.
|
|
PO #
|
A purchase order number to which an invoice will be compared.
|
|
Check #
|
The check number of a client's check to pay either a deposit request, a balance request or an invoice. In most cases, you can enter "C" or "CC" and this field will concert that to "Credit Card" when you move off the field.
|
|
Check Date
|
The date of the check. You can use the [+] and [-] keys to advance or roll back the date, double-click for a calendar, or any other date entry shortcut.
|
|
Date Received
|
(Optional) The date you received the check. This will be used in analysis of the client's payment turnaround. You can use the [+] and [-] keys to advance or roll back the date, or double-click for a calendar
|
|
Check Amount
|
The total amount of the check
|
|
Issue...Memo
|
If a discrepancy occurs that leaves a check or invoice only partially reconciled, you can print a "memo" document that shows the balance and information from the last transaction to which the document was applied. This allows you to process items while having a record of an excess balance to be applied later or funded (the memo can be treated as a "new" document to be processed when the appropriate items are eligible).
Please note that issuing a credit or debit memo is a backup option to the preferred method, which is to cancel the processing of the document and have the document corrected by the vendor or client that issued it. This is because mismatched amounts tend to cause more administrative trouble than desired if used "as is" and typically indicate a mistake has occurred.
|
The brief explanations above will be expanded as needed in the "How to" sections for each processing function, along with more specific fields and buttons used in specific functions.
Usage
The use of the processing functions may differ from one firm to another and from one project to another, depending upon whether you do for-profit projects for outside customer, purchasing management for outside customers or in-house projects. The following table will give you some idea of how the functions are used within different contexts, corresponding to the "Billing" settings on the Orders List screen (which in turn copies the settings on the Project Screen).
In FF&EZ, a "simple" purchasing management project is billing type 2, one in which you issue purchase orders in your client's name and handle the expediting of the shipping and other coordination work, but do not handle any of the client's accounting procedures. An "as agent" arrangement (billing type 3) means you are doing both simple purchasing management as well as tracking and coordinating the deposit and balance payments required by the vendors. Typically, this means that you are receiving vendor invoices and issuing check requests for payments to the vendor in the client's name (but not using your own funds for this).
If you are an in-house department producing projects for your own company, you may use either the "simple" or "as agent" approaches, depending upon who handles the actual payables for the project.
|
Function
|
Resale Projects (Billing type 1)
|
Design-only, Simple Purchasing Management Projects
(Billing type 2)
|
Purchasing Management "As Agent"
(Billing type 3)
|
|
Print Client Deposit Invoices
|
These may be issued if you require a deposit on each order (as opposed to a single deposit for the project). Some funding sources may also require this to document a client's cash draw. Prerequisite: Entering the deposit requirements on the Orders screen under "Client Deposit Requirements."
|
This function is not normally applicable to purchasing management projects, since you would be issuing a deposit request to pay the vendor instead.
|
|
Enter Client Deposit Payments
(This function is almost identical to Enter Client Invoice Payments)
|
You can use this to enter a payment that covers more than one order or deposit invoice. However, it is normally easier to simply enter the payment directly under the "Client Deposit Requirements" on the Order screen.
|
This function is not normally applicable to purchasing management projects, since you would be entering deposit request payments to the vendor instead.
|
|
Issue Orders
|
Orders are issued in your firm's name, with you as the payer.
|
Orders are issued in your clients' name, with them as the payer. Note: For in-house projects, set up yourself (or another department) as the "client."
|
Orders are issued in your clients' name, with them as name of the payer, but with your address as the billing address and with your own firm name "as agent."
|
|
Re-print Orders
|
No differences
|
No differences
|
No differences
|
|
Issue Vendor Deposit Requests
|
The deposit request is used as an internal document for sending a deposit to a vendor. The client's billing information on this document is replaced by your own.
|
Not typically used unless you are copied on all documents. The deposit request is sent to your clients instructing them to send a check to the vendor, and copy you so it can be logged.
|
If you are paying the vendors from a client-funded project account, this operates similar to a billing type 1.
|
|
Enter Deposits to Vendors
|
Used to log deposits sent to the vendor by your accounts payable department
|
Not typically used (but see notes above).
|
Used to match customer deposit checks to the appropriate orders in the database.
|
|
Note: If you typically process vendor deposits for one order at a time, the two functions above are optional. After entering deposit requirements on the Orders screen, you can enter payment information in the same section instead of using these functions. However you must do one or the other otherwise your vendor payment reports will not be correct and deposits to vendors will not be applied when you use Enter/Reconcile Vendor Final Invoices to confirm final quantities and amounts.
|
|
Enter/Reconcile Vendor Final Invoices
|
Used to reconcile vendor invoices against the quantities and costs entered for your orders and any deposits you have paid.
|
Not typically used if you are not copied on vendor invoice documents (see notes above).
|
Based on the PO "bill to" addresses, the vendors send their balance invoices to you "as agent." These are reconciled to outstanding amounts and deposits paid with this function.
|
|
|
Note: This function is critical if you wish to show deposits applied to an order's items and get the net balance owed to the vendor. Although a deposit is recorded on the order earlier in the process, it is not applied to the items until this function is used to confirm "actual" quantities and charges.
|
|
Issue Vendor Balance Requests
|
Used to issue an internal request to pay the vendor for invoice items listed on the request. The client's billing information on this document is replaced by your own.
|
Not typically used unless you are copied on all documents. If applicable, the balance request is sent to your client instructing them to send a check to the vendor, and copy you so it can be logged.
|
If you are paying the vendors from a client-based account, this operates similar to a billing type 1 but with you listed "as agent."
|
|
Enter Vendor Balance Payments
|
Used to log payments sent to your vendors and mark orders as "paid to date."
|
Only used if you are tracking and reporting this status, used to log customer payments against outstanding balances.
|
Used to log customer checks against outstanding balances. This is crucial to reporting a project's net balanced owed.
|
|
Print Client Invoices
|
Prints invoices for the sell price from the contract, including tax amounts based on the tax rate and freight amounts from vendor invoices.
If you are invoicing from your accounting system, you can print the "Invoice Detail" format instead.
|
Prints invoices for your purchasing fee, based on the presence of a "Purchasing Fee %" on each item. Not used if you are billing a fixed fee directly from an accounting system.
|
Prints invoices for your purchasing fee, based on the presence of a "Purchasing Fee %" on each item. Not used if you are billing a fixed fee directly from an accounting system.
|
|
Enter Client Invoice Payments
|
Used to log payments by your clients against invoices you issued to them for the sell price of the FF&E, taxes and freight. Not used if you are invoicing from an accounting system.
|
Use to log payments from your client for your fee invoices (if you are using "Print Invoices).
|
Use to log payments from your client for your fee invoices (if you are using "Print Invoices).
|
|
Close Orders
|
For all billing types, this is an end-of-project maintenance function. You can use it to mark any scope (typically all orders in a project) as "Closed." Closed orders drop off the Orders and Expediting screens, although they will appear in Order screen reports. Closed orders can be redisplayed on the Orders screen by disabling the "Hide closed orders?" option at the bottom.
|
|

