|
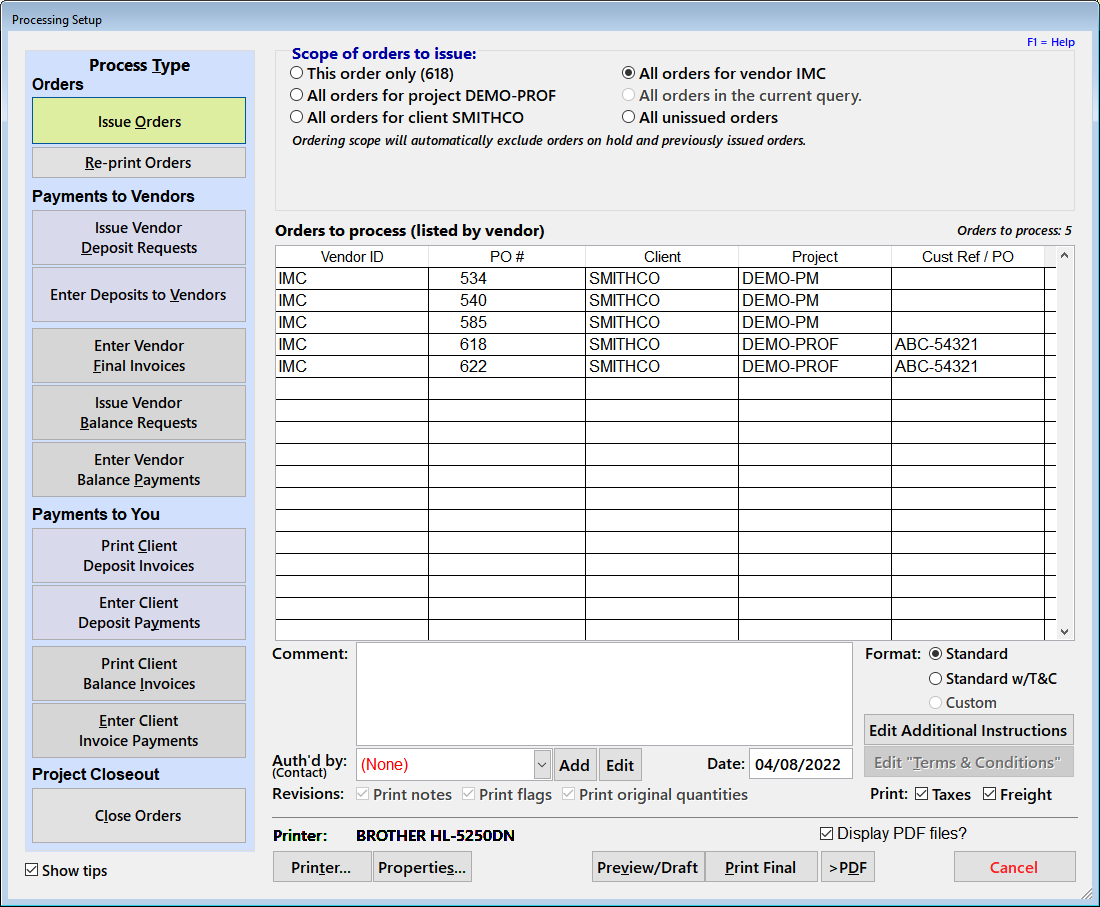
Use this function to officially issue orders to vendors. This function allows a number of scope options to narrow down which orders you want to issue. It includes a "Draft" option to print draft versions of orders for review. When you select the Print Final or [>PDF] options, the system will print all the orders in the scope. After you confirm that they printed correctly, the orders will be date-stamped as being "issued" (the confirmation prompt allows you to deal with a printer malfunction or other unexpected issues.) At this point, the automatic revision system is enabled for these orders and further changes will be tracked.
Note: If you use the Preview function to preview orders, keep in mind that each order is a separate report. This means that the preview will close and then open to show the next order (if any) when you click on the "exit" (red "X" or door icon) button on the preview toolbar. However, if you press [Esc] instead, the system will ask if you want to cancel any further previewing.
Basic Procedure
Before using this function, be sure to review the general description of the Processing Tools screen, which covers the most common fields and options that you may see. To issue one or more orders, follow this procedure:
- On the Orders List screen, move to the first order that you want to issue or if appropriate, create a query to display only orders meeting specific conditions (queries are not commonly needed since the standard ordering scope options usually provide enough control over what will be issued).
- Click on the Processing button to display the Processing Setup screen and then select Issue Orders.
- Scope: Select an appropriate scope of orders to issue. If you were on the first eligible order, "this order only" will be the default scope (if you were on an already issued order, that scope will be disabled). Be sure to understand that this function will never issue an order that has already been issued nor any that have been placed on "hold" on the Orders List screen.
- Enter any comment text needed for the orders that will be issued. Comments are short notes that are specific to the orders, not general boilerplate. Comment text will be saved until you close the Orders List screen or change it manually.
- (Optional) Select an "authorized by" name from the drop-down list (or add a new one if needed with the Add button. This name will be saved with the order when the issuing process is complete.
- (Optional) Change the "Date" to the desired "official" date for the document. If you do, this will display in red and will reset itself after the document is printed.
- Format: If you have a custom purchase order format, it will be selected automatically, but you can temporarily select the "standard" format if desired or the standard format that has a separate "terms and conditions" section at the end. If you override the initial selection, FF&EZ will remember that choice during the current FF&EZ session.
- If you have entered permanent boilerplate text for the order's "Notes" section, you need do nothing. If you need to add or edit the text, you can do so with the Edit Additional Instructions button. Keep in mind that boilerplate text is saved and will apply to all future orders, so use the "Comment" instead field for specific, temporary instructions to the vendor. If you choose the "Terms and Conditions" PO format, these are edited separately from the "Notes" boilerplate.
- You have the option of including the vendor's freight quote and either a tax quote or tax calculation (using the % on the order screen). This is controlled by the two options below the boilerplate edit buttons. The tax option does not apply to billing type 1 orders unless the "Apply as a VAT type" option is in effect.
- If you need to, select an appropriate printer with Print Setup. Note that you cannot change the orientation or margins for any report formats, because they are integrated with what are often very tight layouts.
If you have a "PDF" type of printer and select it or if you use FF&EZ's simpler [>PDF] button in step 11, keep in mind that each purchase order is a separate report, so you will be prompted for a PDF file name for each order. Please see "Issuing with a PDF printer" below. Also, if you use the internal [>PDF] option and do not wish to have the resulting PDF files displayed in a PDF viewer, uncheck the "Display PDF files?" option. To immediately view PDF files on a multi-user server, a PDF viewer must be installed or the default "open with" application for PDF files must be set to a web browser with this capability.
- (Optional) Select Preview/Draft to preview the orders and print them individually. Please note that the format will have the word "DRAFT" embedded in it when you use this option. If you plan to issue the orders, do not print to a printer while previewing, since this will not "issue" the orders (next step) and will superimpose the word "DRAFT" at the top.
- Select Print Final to send the orders to the selected printer, or select the [>PDF] button next to it to send the orders directly to PDF files (one file for each order).
- If you used Print Final (to a printer or PDF files), the system will prompt you to confirm that the orders printed correctly. If they did and you want to finalize the issuing of the orders, answer "Yes" and the system will mark those orders with an "Issued" date. If you don't, you will return to the Orders List and no data will have been changed.
To reprint orders, use the Processing command's Reprint Orders option.
Printing orders to PDF files
Many people want to save issued orders to a PDF file, either 1) to email the orders to a vendor or client and/or 2) to create an archive of "as issued" orders for reference. FF&EZ allows you to do this for one or multiple orders.
We recommend that you use FF&EZ's [>PDF] command (next to Print Final) to create all PDF files—it is much easier to use. You can also use a Windows PDF printer if you have one installed, but be aware that these will produce "image-based" PDF files with FF&EZ. The procedure that you use will differ only slightly depending on which option you use:
When you use FF&EZ's [>PDF] command:
- If you are issuing multple PO's, decide whether you want to view each order as it is created. If you don't want your PDF viewer to be called to display each, uncheck the option for displaying PDF files.
- The "Issue" function automatically pauses with a pop-up prompt before creating each PDF file to prompt you for a file name.
- When you see the prompt, it will be pre-filled with an automatic file name that follows the pattern "Vendor ID + PO #" (e.g., ACME-00001234.PDF).
- You can change this name (and the target folder) or confirm it. The PDF file will then be created.
- At this point, if there are more POs to process, you will return to step #2, otherwise the file generation process will be complete.
- The [PDF] button is a "print final" type of function, so you will then be prompted to confirm that all documents were successfully created. You should confirm this (or cancel it) as soon as you can, since it may tie up the ordering data for changes by other users. If canceled, the orders remain unissued and must not be distributed.
When FF&EZ detects that you are issuing orders with your own PDF printer:
- It automatically pauses with a pop-up message after sending each order to the PDF printer, so that the PDF printer can separately prompt you for a file name. The text of the message instructs you to leave this prompt on the screen until after you complete the next steps.
- When your PDF printer prompts you to name the PDF flie, you can enter a file name manually or you can paste an automatic file name into the name field using the Windows Ctrl-V hot key for "paste." By default, FF&EZ loads a name that follows the pattern "Vendor ID + PO #" (e.g., ACME-001234.PDF), and if you click in the file name box and press Ctrl-V, the name will appear. Again, this only applies when you use an external PDF printer.
- After giving the PDF printer a file name and confirming it, the PDF file will be created as it normally is for your PDF printer, which may also display the file.
- At this point, you can click on the Okay option on the pop-up from item 1 above to process the next PO for printing.
|

