|
After entering the final invoice from a vendor for items on an order, you can issue a check request to have the balance amount paid. This function is used for projects in which you are providing full purchasing management services to either an outside client or internally (where, like a deposit check request, the check request becomes a memo to your accounts payable). Because it allows you to enter invoice information on a per-item basis, FF&EZ allows you to process partial orders instead of having to wait until an order's entire shipping is complete.
The system will organize all order items in the scope to create a single check request for each combination of project and payee. This means that the request and resulting check may include items from multiple orders, reducing the effort of updating this data. Later, you can use the Enter Vendor Balance Payments function to apply a check to all items on the original request.
Before using this function, be sure to review the general description of the Processing Tools screen, which covers the most common fields and options that you may see. To issue one or more balance check requests, follow this procedure:
- On the Orders List or Expediting screen, move to the first order that you want to process or if appropriate, create a query to display only orders meeting specific conditions (queries are not commonly needed since the standard processing scope options usually provide enough control over what will be printed).
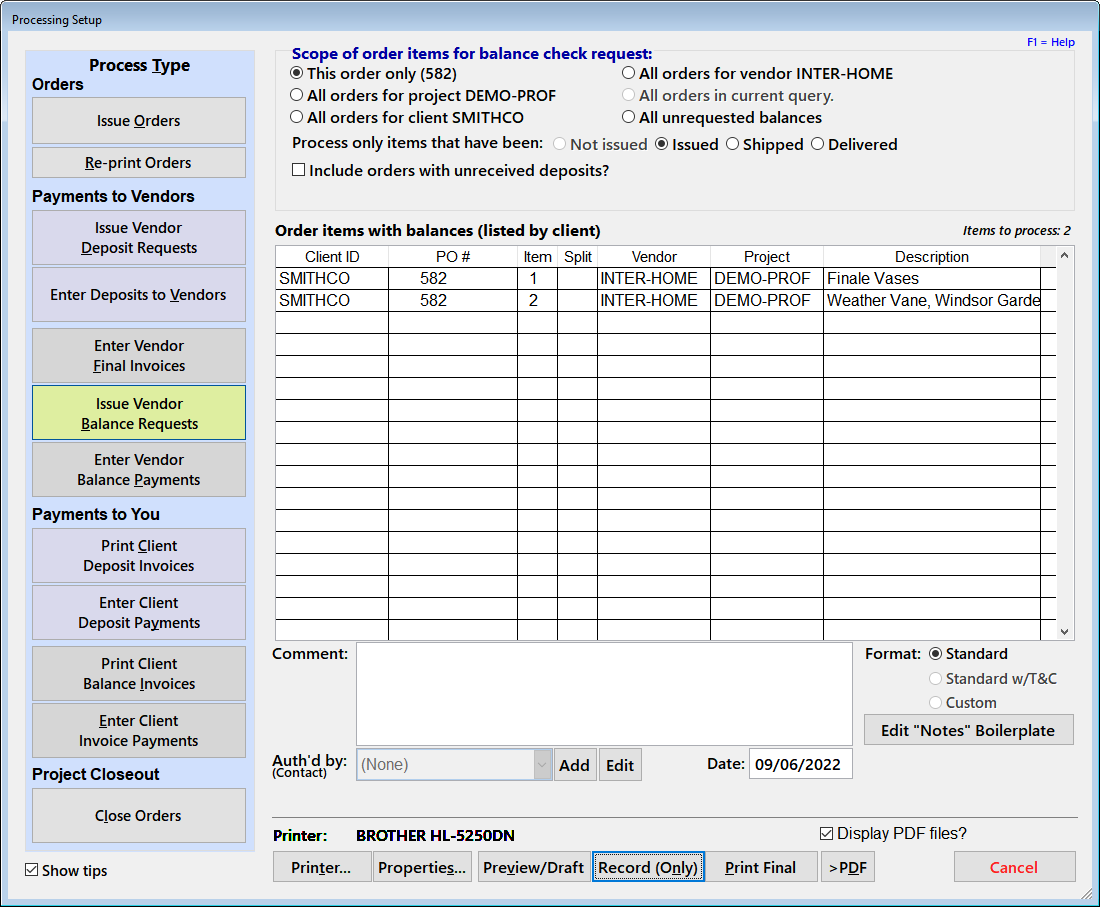
- Click on the Processing button to display the Processing Setup screen.
- Select Issue Balance Requests.
- Select an appropriate scope of order items to process. If you were on the first eligible order, "this order only" will be the default scope. However, if you were on an order for which all items have been processed or for which no balance amounts have been entered, that scope will be disabled since these cannot be processed.
- Normally this function will also ignore items that have not been shipped, however you can override that with the "Process only items that have been" option to include eligible orders that have been issued (but not shipped) or only orders that have been delivered.
- Enter any comment text needed for the items that will be processed. Comments are short notes that are specific to the documents about to be printed, not general boilerplate. Comment text will be saved until you close the Orders List screen or change it manually.
- If you have a custom check request format, it will be selected automatically, but you can temporarily select the "standard" format if desired (this stays in effect during this FF&EZ session).
- If you have entered permanent boilerplate text for the balance request's "Notes" section, you need do nothing. If you need to add or edit the text, you can do so with the Edit "Note" Boilerplate button. Keep in mind that boilerplate text is saved and will apply to all future balance requests, so use the "Comment" field instead for specific, temporary instructions to the payer.
- If you need to, select an appropriate printer with Print Setup. Note that you cannot change the orientation or margins for any report formats, because they are integrated with what are often very tight layouts. If you have a "PDF" type of printer and select it, keep in mind that each request is a separate report, so you will be prompted for a PDF file name for each order.
- (Optional) Select Preview/Draft preview the requests and print draft versions individually. Please note that the format will have the word "DRAFT" embedded in it when you use this option.
- Select Print Final or the [PDF] button to send the final request documents to the selected printer or create a PDF file directly.
Alternate: You can create check requests without printing them by using the Record (Only) button instead. This is an option if you want to use the "Requests List" reports on the Check Request screen to document all vendor invoices that were processed within a window of time, but don't need the physical (or PDF) document itself. If you create check requests with this option, you can print them later from the Check Requests screen.
- If you used Print Final or [PDF] in Step 11, the system will prompt you to confirm that the documents printed correctly. If they did and you want to finalize the processing of the affected orders, answer "Yes" and the system will mark those orders with request # on which the deposits were requested. If you don't, you will return to the Orders List and no data will have been changed.
You can review all check requests on the Requests List screen, as well as reprint selected requests there.
|

