|
Quick Access Function Key: [F6]
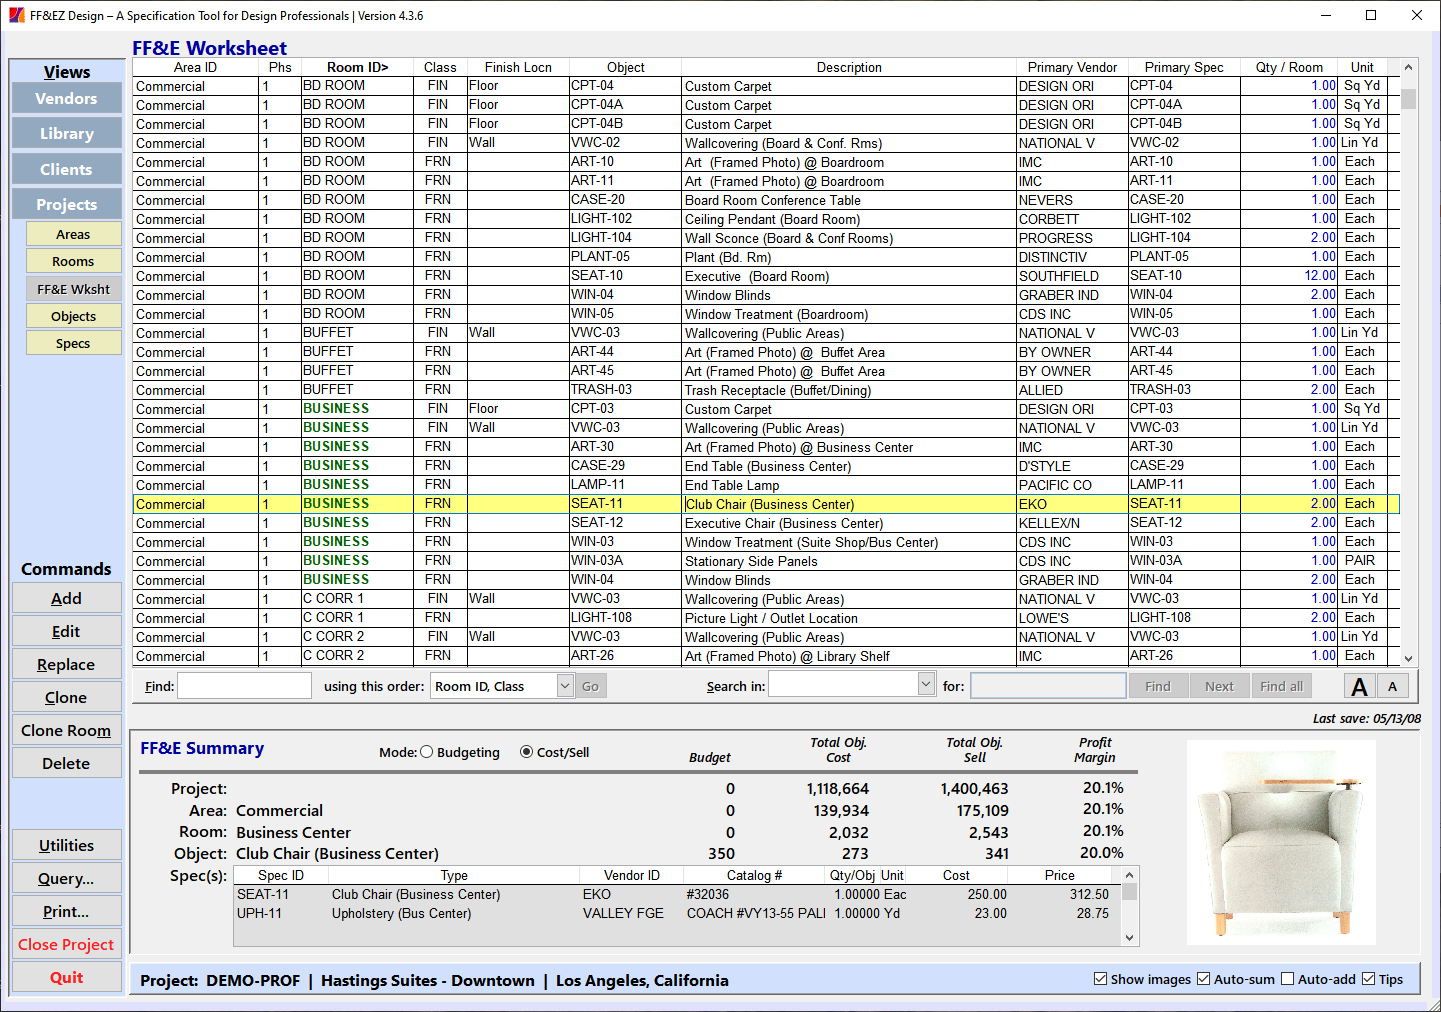
The FF&E Worksheet is the heart of FF&EZ. On this form, you can see "what goes where and how many" and print project presentation reports. Each row in the worksheet's list represents an "occurrence" or "instance" of using an object in a room, with the "Quantity" column showing how many are to be placed in that room. Please note, though, that each row also represents an instance of a room being used to contain an object. The realization that both statements are true is one key to understanding the different ways you can use the Worksheet.
Most columns in the list are self-explanatory, with the "Primary Vendor" and "Primary Spec" columns showing the vendor and specification of the primary component for the object or "?" if one has not been attached.
You can can display the FF&E Worksheet by selecting a project from the Project List, opening it with the Open command and then clicking on the FF&E button under Views.
Fields
Commands
Screen Options
Worksheet-oriented Data Entry
Key Concepts
- The FF&E Worksheet displays occurrences of objects in rooms (room contents). Adding an entry for an object "uses" that object (points to it). Deleting an entry does not delete the object itself, only the use of it in that room. Except for very simple "sales order" type projects, the quantity you enter is the amount that goes into one room of each room type with the room count on the Room Screen driving the total quantity needed.
- If you edit a row in the worksheet, changing the selected object substitutes the new selection for the original object, while changing the selected room has the effect of moving the object to that room.
- You can change the quantity of any entry directly by clicking in the quantity column in the worksheet list (top of screen) and entering a new value.
- The reports available on the FF&E Worksheet only include objects and related specs that have actually been used in the worksheet (that is, placed in a room). Use these for external communications (client presentations, ordering data, etc.)
- The reports that are available on all screens except the Worksheet are meant for internal management of your data, and always include unused and alternate objects and specifications. These reports do not include the quantities of any FF&E items.
- If you use the Query tool on this screen and include a filter that references a specification or vendor field, keep in mind that the FF&E worksheet is a list of objects in rooms, not individual specs. This means that your query will correctly return all the matching objects, even if not all specs in those objects meet the query. As an example, if you create a query that looks for all fabrics from Vendor ID "ARTTEX," the list will show all objects using that vendor, as you would expect. If you create an Ordering Worksheet from the query (or use the Order function in the Design/Purchasing version), FF&EZ will print or order all the products involved in the selected objects, not just the fabrics. This prevents accidentally ordering only a portion of an object with multiple components. In the Purchasing module, this will create the necessary orders for the objects, but with the usual "unissued" status So if you need to only order the fabric, you can still do so by not issuing the other orders.
- When printing reports from the FF&E Worksheet, the "Filter" options on the Report Setup screen gives you the option of printing the current object, vendor, room or area. This feature can be used to stage various parts of the project for reporting purposes.
A very important aspect of the FF&E Worksheet is that it shows what is actually "in" the project, in the sense of being used in rooms. FF&EZ allows you to have alternate or unused specs and objects in the spec and object lists; the only items that get printed on reports called from the Worksheet are those actually used in rooms (including secondary specs that are a part of an object).
There are five ways to create entries on the FF&E Worksheet list:
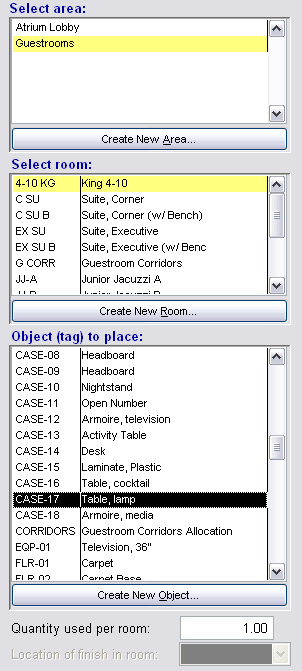
- Use the Add function on this form, then select an area (if needed), a room and an object to place in that room.
- Select an existing occurrence, then use the Clone function and select a new room in which to place in the same object.
- You can add object instances by using the Object or Save/Object functions on the Specifications List form, which is a way to create or modify an object after adding a new spec. It includes an option that will place an object in a room with a specified quantity.
- You can copy an entire room using the Clone function on the Room List form. This is a very easy way to create a room that is almost the same as another room so that all you need to do is add or replace certain objects as needed for the cloned room. (Note that cloning a room does not clone the objects or specs in it. These continue to point to the original objects and specs, as they should).
- You can import a room from another project. including all its objects and their associated specs, using the Add> Import command on the Room List form (most easily done at the beginning of a project).
The FF&E Worksheet looks a little different from other forms. Where most forms have a data area, this form shows an overall FF&E summary of the project. It also includes the current area and the current room that you are in and a list of the components for the currently highlighted object, all of which are "double-clickable" to trigger editing of that item. This summary can show "budget and actual" or "cost and sell" information, depending upon the "Mode" setting.
Basic Procedure
Here is the basic procedure for adding room contents, without addressing (yet) the issue of what to do if something you need does not exist yet:
- On the Worksheet, click the Add button to open the editing display in "add" mode.
- If not in the desired area already, use the "Select area" pick list to select an area in which to work. Hint: When a pick list has "focus," type the first few characters of the item you want, and when it appears, press [Tab] to select it and move to the next field. If you don't need to change the area, just [Tab] or click to the next list.
- If needed, use the "Select room" pick list to select a room, then press [Tab] or click to the object list.
- Select the object you wish to use from the "Place object" pick list. Then [Tab] or click to the "Quantity" field (you can also simply press the "Enter" key on the room to skip to the quantity).
- Enter the quantity you wish to place in the room in the "Quantity in room" field. Press [Tab].
- If you have selected a finish, the "Room location" field will be active. Select a location for the finish and press [Tab].
- You should now be on the Save button. Press [Enter] to save the new record. As with other editing screens, pressing Ctrl-Enter will also save the new entry.
If you have turned on the "Auto-add" option, or if you click the Save w/Auto-Add button instead of just Save, this sequence will repeat automatically.
|
|
Advanced Procedures
While you are using the Worksheet's Add function, you can also create new areas, rooms and objects as you need them, using the Create buttons just below the associated list. This means that you can create an entire project from the FF&E Worksheet, without needing to move to the other screens (because they will be called for you as you need them). You can also do this when you Edit or Clone an occurrence, although the items you need tend to already exist at that point.
This approach is called "worksheet-oriented data entry," and is recommended because the Worksheet's editing screen shows you the current contents of the room you are working on, minimizing mistakes of omission in setting up the project. Although you can actually create fully detailed specifications this way, in practice this method is used to quickly create a budgeted list of room contents with "placeholder" specs already attached, leaving you with a list of specs that only need to be detailed and priced to complete the project. You can edit those specs by moving to the Specification List form and editing them, or you can work through the FF&E Worksheet, double-clicking a spec in the FF&E Summary area to edit it directly.
The reports for the FF&E Worksheet are the most extensive of all the forms in the Design system, and contain the reports that are used for presenting the design to both clients and vendors.
Data Fields and Controls
Since "editing" on the Worksheet form consists mostly of selecting items from other lists, the fields and controls found on it differ a bit from the other forms. The first difference is that you will not see these fields unless you have clicked either the Add, Edit or Clone button:
Location Data
|
Select area
|
This list box contains a list of all the areas in the project. When you are adding or editing and click on an area, the room list below it will refresh to show the rooms in that area.
|
|
Create New Area
|
To create a new area, click this button. It will display a blank Area Form ready for you to fill out and save, then it will return you to the worksheet.
|
|
Select room
|
This list box contains a list of all the rooms in the area selected on the left. When you click on a room, you are selecting that room as the one in which you are working.
If you are editing an existing worksheet entry, you can change the location of that object to a different room (that is, move it) by selecting the target room here.
|
|
Create New Room
|
To create a new room, click this button. It will display a blank Room Form ready for you to fill out and save, then it will return you to the worksheet. When you add a room, the Rooms screen also includes a New button you can use to add a new area if one is needed.
|
Object Data
|
Place object
|
This list box contains a list of all the defined objects in the project. When you click on an object, you are selecting that object as the one to place in the selected room ("Location Data" above. If you are editing an existing worksheet entry, you can change the current object in the room to a different one by selecting it here.
Note: If you double-click an object on the this pick list, the system will immediately select and save that object with the current quantity (which defaults to 1 when adding). If Auto-Add is enabled, you can continue by picking another object to add (if not or if you were editing, you'll return to the main Worksheet screen as you would if you clicked on Save).
|
|
Create New Object
|
To create the new object, click this button. It will display a blank Object Form ready for you to fill out and save, then it will return you to the worksheet. On the Object Form, you will have the same options you will normally see, including the ability to create automatic placeholder specs or use a New button to call the Specifications Form and create fully detailed specs (manually or by importing).
|
|
Qty in room
|
In this field, enter (or change) the quantity needed for the selected object in the selected room. Only enter the quantity needed in one of that room, not the total needed for the project. The quantity you enter must be in the units specified for the object on the Object List screen.
|
|
Finish Location
|
This field (below "Quantity") is only available when you are working with a finish object (where the "Class" is "FIN") and is a required field if you are. Select the general location for the finish within the selected room (used for sorting in Finish Schedules).
|
Current Contents
This large box contains the list of objects that are currently in the room selected with the room pick list. It's purpose is to allow you to easily see which objects have already been added to the room on which you are working There are several visual cues that will help you add and edit occurrences of objects: 1) A status label at the top right of the box will remind you of what action you have selected. 2) If an object you have selected already exists in the currently selected room (and finish location, if applicable), the row in which it appears will be highlighted and the font will be red.
At the bottom of the list will be a total of the prices for that room (which will equal the costs in a fee type project) and if the room count is greater than 1, a grand total will also appear beneath that. If a budget for the current room type has been entered, that also will be displayed (in red if the budget has been exceeded).
FF&E Worksheet Functions
The function buttons for this form include these:
Add Edit Replace Clone Clone Into Delete Utilities Query Print
|
Add
|
Used to add a new entry. Choosing this command will take you to the area list. You will then need to select an area and a room in that area, then choose an object to place in the room and the quantity to use. When you save the entry, the system will check this combination of room and object to verify that it does not already exist. If it does, you should simply find the existing entry and edit it.
To cancel the Add command, press [Esc] or use the Cancel button.
Once you have entered the desired information for the record, click on the Save button or press [Alt-S] or [Ctrl-Enter] to save your work and leave the editing mode.
Instead of Save, select the Save + Auto-add button to have FF&EZ automatically start the Add function again after you save the last entry (the Auto-Add option on the lower right will turn red to indicate it is active). This allows you to simply add object usages as a continuous process. When in this mode, use the Cancel button to cancel the process and return to the Worksheet.
All new records will be indexed automatically so that they will appear in their proper place in the database.
|
|
Edit
|
The Edit command is similar to the Add command, except that you are working with an existing record. The Edit command always acts on the record currently highlighted on the screen, so if you wish to edit some other record, use the up and down arrow keys or the Query command to highlight the desired record first.
You can change the area/room, the selected object and/or the quantity. Changing the area/room has the effect of moving the object to a new room. This may be useful if your project includes an inventory of existing items that are being re-used or which have been temporarily put in storage.
Once you have made the desired changes, click on the Save button or press [Alt-S] or [Ctrl-Enter] to save your work and leave the editing mode.
To cancel the Edit command, press [Esc] or use the Revert button.
Note: If all you are changing is the quantity, that value can be entered directly into the blue "Quantity" column on the main Worksheet list without using Edit. Press [Enter] or use the "down" arrow key to record your entries.
|
|
Replace
|
The Replace command can be used to replace an existing object wherever it occurs in the project rooms. It can also be used to delete all the object's occurrences without deleting the object itself from the Object List screen.
When you select the command, you will see a pop-up that lists all of the current locations in which the object has been used.

A Select All button let you quickly select all rooms. If you select a replacement object, the system will check to be sure the new object is not already in the same rooms. If it is, those rooms will be colored gray. You can still choose these rooms, however the system will only delete usages of the old object, not replace them.
To avoid serious, accidental quantity errors, this command does not "add" the quantities if the object already exists in the room. After running the command, use the Worksheet's "Qty" column to manually update the quantities for grey entries in this list.
You will also see instructions and two checkbox options:
Delete this object from the selected rooms instead of replacing it
If you select this option, all of the usages of the object will be removed from the FF&E Worksheet. The object will not be deleted from the Object List and will remain for future use. (Note: If you wish to completely delete the object, its occurrences and (optionally) its spec components, use the Delete command on the Objects screen instead.)
Only display objects from the same tag group?
Since it is most likely you will replace one object with a similar one, this limits the display of objects on the right to only those with the same Tag prefix (e.g., the prefix for "ART-098-123" is "ART". This aids in navigating the objects in larger projects.
|
|
Clone
|
Use this command to create a new usage of an existing object in one or more other rooms.
When the command is chosen, you will see a pop-up tool on which you can select the target rooms. The quantity that was entered for the item you are cloning will appear as the "default quantity" for new usages of the object. You can disable this or change the quantity as needed.

If all of the new occurrences will have the same quantity as the source, simply place a "check" in the "Select" column and the default quantity will be entered under "Qty to Add."
If you want to place the objects with a zero quantity (that is, to be determined later), you can either disable the default quantity, change it to zero or change the quantity for individual rooms.
If you deselect a room, it will not be included and any quantity you entered will be cleared.
Rooms that already contain the object usage being cloned will not appear. If the object is a finish (Class = "FIN"), its current room finish location will also be duplicated (i.e., if a carpet has been assigned to "Floor" it will also be assigned to that location in all new rooms).
The "Total added" value at the bottom is based on the room type count and the qty of the object entered. It is provided as a check on the expected quantities.
To cancel the Clone command, press [Esc] or use the Cancel button.
Note: The previous version of this command is still available if you right-click this button. That version displayed the Worksheet's editing screen to clone an object usage into a single room, and may be faster if you are cloning a single usage to another room in the same area.
|
|
Clone Into
|
The Clone Into command allows you to select an existing room and clone its contents (or selected portions of its contents) into an existing room in the project. This is the same command found on the Rooms List screen. The source room is the room associated with the currently highlighted object usage.
Any objects from the source room that already exist in the target room will not appear in the list of objects to clone.
As a convenience, if you right-click this button, it will call the normal Clone command from the Rooms List screen. This will create a new room, copying everything in the current room, then return you to the FF&E Worksheet.
|
|
Delete
(Undelete)
|
The Delete command is used to permanently remove an entry from the worksheet. Other than the reports, it does not effect any other part of the database (that is, the object itself is not deleted from the Object List, only the particular use of the object in that room). If you choose this command, you will be asked to confirm your choice. While using the list at the top of the screen, the shortcut for the Delete command is the [Del] key.
The Delete command on the FF&E Worksheet only deletes the currently highlighted object usage.
If you need to delete multiple occurrences of the same object from the worksheet (from multiple rooms), use the Replace command above with the "Delete this object" option enabled. If you wish to delete all multiple occurrences and also delete the object itself from the project, display the Objects List and use the Delete command on that screen instead.
The Undelete command (right-click) displays a list of eligible deleted Worksheet object usages that can be restored. Only usages for existing rooms and objects can be restored. Usages can be restored as long as the the File Cleanup utility has not been run and they were deleted with version 4.03.30 or later. For more detailed information, see the Undelete Worksheet Usage section.
|
|
Order
|
(Only in the Purchasing version or Design versions with the "Orders Export" plug-in installed). This function displays an Orders Setup screen that allows you to specify the scope of objects that you wish to order and print a matching "Ordering Worksheet" report.
|
|
Utilities
|
Clicking this command displays special functions that make some tasks easier or that handle special problems or needs. The Utility functions are explained in the next section.
|
|
Query
|
When you choose this command, the system will display the Query Form. This command is used to limit the display (and subsequently, reports) to clients that meet certain conditions. For more information, see the Query Form topic.
You can close the Query form by pressing [Esc].
|
|
Print
|
This function displays the Reports Form, on which you can select and print reports specific to this form. The reports for the FF&E Worksheet are the most extensive of all the forms, and contain the reports that are used for presenting the design. For more information, see the detailed descriptions and procedures about reporting elsewhere in this manual.
|
To save time in using commands (and the system in general), be sure you are familiar with the various keyboard and mouse shortcuts that are available to you.
Utilities
|
Setup Check
|
This is a special query that checks for worksheet entries, objects and specs that may be missing critical information that would leave the database setup incomplete. For instance, object occurrences in the worksheet with zero as a quantity or objects with either no components or components with zero quantities would leave out costs and quantities that need to be reported. When you select this command, a pop-up will appear that allows you to select (or deselect) the conditions that you want to test.
Not everything this query displays is a problem, but to avoid incomplete reports and orders, you should use this feature regularly to help troubleshoot your data. Items that meet the query will typically have some column or FF&E Summary data displayed in red, and these are the first items you should check.
Since this is a standard query, you can run reports from it and use it as an on-screen "punch list" to correct your data. Since you can double-click areas, rooms, objects and components shown in the FF&E Summary to edit the source record, this can be a very simple process.
Note: If you correct an item so that it no longer qualifies for the Setup Check query, it will disappear from the list until you select Show All at the top of the screen or clear the query.
|
|
Export
|
The Export function can be used to create a file containing Worksheet data (location and contents) that can be imported or used by other programs. There are several options for both the type of format and for the level of detail contained in the export file. See "Exporting Data."
|
|
Pricing Tool
|
This allows you to set prices for all specs or a subset of them in one operation, using any desired markup or profit margin and applying special pricing adjustments. Since you are setting prices for specifications, the resulting prices for objects seen on this screen will be the extended total based on all components of the object and the quantities of product used per object.
|
|
Import List
|
This utility allows you to import preformatted text data generated from an external source, such as another database or a spreadsheet. There are specific requirements and restricted that you will need to understand prior to importing data. This is covered in the "How To" section under Importing Data from External Sources.
|
Screen Options
Unless noted otherwise, these options typically appear in the lower right corner, on the status bar.
|
Show Images
|
This option controls whether images are displayed when you click on an object in the main Worksheet list or one of its components in the FF&E Summary area. By default, this is enabled since modern systems are not slowed by the display of graphic images.
|
|
Auto-sum
|
Controls whether the summary area automatically updates after data is changed on this form or others. This is enabled by default and would only be needed on a very slow system.
|
|
Auto-add
|
If enabled, this continues the operation of adding a new object to the Worksheet without returning to the main Worksheet screen. It can also be enabled using the Save w/Auto-add option when you save an object occurrence into a room using the Add command above.
|
|
Tips
|
The "Tips" option controls whether or not you need "fly-over" help or hints when your mouse cursor hovers over a control or a field. This can be extremely helpful for new users, since these explain the purpose of the item and may list shortcut keys that can speed up simple operations.
|
|

