|
Version 4.2.032 (Mar 2021)
|   |
|
Version 4.2.032 (Mar 2021)
| |
|
Design Module |
|
General |
Note: Help systems are like web browsers�you can reduce or enlarge the text size of the content: Click in this content area to give it focus, then hold down the [Ctrl] key and roll your mouse wheel. The text and graphics will increase or decrease in size. If you don't have a wheel, this also works with [Ctrl][+] and [Ctrl][-] on numeric keypads. [New] To make it easier to review changes with each version, there is now a New Features button next to the Help button on the opening screen. This displays Help positioned on the appropriate "Version Changes" page. The "Version Changes" section has been reorganized to move entries beneath sections for each minor version. [New] Added a How to be a Power User section in the Help Introduction. [Enhanced] After this update is installed, the Utilities> Update Software command will now check in your standard "Downloads" folder for a downloaded FDZ file instead of your "Documents\FF&EZ-Import" folder. This eliminates the step of moving a downloaded update file to "FF&EZ-Import" after downloading it (or of needing to browse for it). This only applies when updating software, which starts by downloading the file to your system's default "Downloads" folder. The "staging" folder for images is still under "FF&EZ-Import" (unless you change it with the Setup> System Information command). Report updates (usually sent as an email attachment you save yourself) should be saved to "Documents\FF&EZ-Import" as before. This only applies to the Update Software command in this and later versions. If you are upgrading an earlier version to this version, the older version's update utility will still check in "FF&EZ-Import." |
|
Utilities |
[New] A new image optimization utility has been added to address limitations in the use of high-resolution images in very large projects. If you experience distorted images in an "Illustration Sheet" report (which has been reported in some reports longer than 200 pages), you can use this utility to down-size the images for that project. Images that are processed this way are backed up to a subfolder of the "Images" folder named "Originals." |
|
Clients |
[Fixed] Changes to the general import function caused a "file not found" error in the Import List command on this screen (used to import FDZ files from other FF&EZ systems). |
|
Vendors |
[Fixed] Changes to the general import function caused a "file not found" error in the Import List command on this screen. |
|
Specifications Library |
[Fixed] Changes to the general import function caused a "file not found" error in the Import List command on this screen. |
|
FF&E Worksheet |
[Fixed] On billing type 1 projects, the "Ordering Worksheet" report calculation for estimated freight was reduced by the amount of the markup % on the specification. This did not affect quotes or any reports from purchasing management projects. |
|
Object List |
[Enhanced] The "Object Component Status" report now includes an option to control whether the report only includes or excludes objects that have been used in the FF&E Worksheet. [Fixed] When the Object List screen first appears, the "Show report descriptions" setting was not in effect, even though the option appeared to be checked, requiring the users to uncheck it and then recheck it to properly put it into effect. |
|
Specifications |
[New] You can now drag an image file to an empty image frame on a specification you are editing. That is, this is only enabled in "adding" or "editing" mode and only when no image has been selected yet (or you have cleared an existing one). Note: This capability has not been added to the Library screen yet. When you drag a valid image, the rest of the image attachment process will automatically proceed, allowing you the same options as before. Dragged images are temporarily renamed after the Spec ID and placed in the normal temporary images staging folder for the project. Dragging an image from a web page should work if you are dragging from the original image. However, dragging directly from a search result (e.g., Google images) or a "rotating" image block (such as those showing different views of a product) may not include data in a format that FF&EZ can use to download the image. This will result in either a non-fatal error message or a blank image on the image selection pop-up screen.
Please note that if you are familiar with the Specifications screen's Auto-Image Utility, it is still the most efficient way to attach a large number of images that are already associated with a specific vendor and catalog/model number. [New] Access to image editors: When you are editing a specification with an image attached, there are new buttons that allow you to either locate the image file (in File Explorer) or edit the file directly with Microsoft Paint. If you use Locate, you can use right-click and Open with... to access any other image editors on your system.
This is only available while editing the specification. Important: If you make and save changes to an image (such as cropping it), after saving the image it is important to return to FF&EZ and save the specification. This allows FF&EZ to update database information about the revised image. You will be reminded to save the specification if either of these options is used and you later select the Revert option instead of Save. [New] On the pop-up that appears when the Select... command is used to attach images, a Select from the Image Library button has been added.
This makes it easy to attach an existing library image, especially one used as a generic image for products like standard drapery types or trim shapes. [Enhanced] The Utilities> Pricing Tool command now warns you if you use the "multiply existing prices" option and enter a multiplier that seems to be much larger or smaller than expected for that option. For instance, entering 5.00 will multiply prices (not costs) by 500%. [Enhanced] The "Specification Status List by Usage (Tag)" report now includes an option to control whether the report only includes or excludes objects and specs that have been used in the FF&E Worksheet. [Fixed] Previously, when selecting images with the Select button from the project's temporary images folder, if you canceled the Windows file selection dialog, it also canceled the "Select" process. You are now returned to the selection dialog instead of the Specification form. [Fixed] After changing the "Vendor" column to display the Vendor ID instead of the Vendor Name, the sort order was not changed to match. This caused vendors with IDs that did not mimic their names to display in the wrong position alphabetically. This only affected the Specification screen's list display. |
Purchasing Module
(These only apply if you have the Design/Purchasing version)
|
Project List |
[Enhanced] You can now specify the length of purchase order numbers that use a project-based prefix code. This reduces the number of zeroes used to "pad" the numeric portion when your PO prefix is short:
To avoid running out of PO numbers in a project (that is, if it develops an unexpectedly high number of orders), you cannot specify a length less than three numbers (giving each project at least 999 orders that can be issued). |
|
Order List |
[New] There are three new Help System entries:
[Fixed] The estimated tax amounts on the "Vendor Payment" reports did not include the tax on a freight quote if a quote was entered and the freight tax option was enabled on the Project screen. This did not effect the actual vendor tax amounts. On the "Vendor Payment List" report, the final "Report" total for the estimated net cost after deposit did not include an amount for calculated taxes. All totals above it, including that for the project, were correct. Some totals had a formatting issue with the allowed size of the numbers, producing a "***,***.**" display. [Enhanced] The "Balance" total on vendor payment reports has been changed to "Est. Balance" to reflect that this number is based on the original order item amounts, tax and freight. This number may not drop to zero if the vendor invoices different amounts. It may show a negative number if more deposit has been paid than the total of the original amounts. [Enhanced] A new content option on the Export command allows you to include the amounts entered from vendor invoices and any payments applied. [Enhanced] When entering a deposit "Check #" entry, in addition to the option of entering only "C" or "CC" (converts to "Credit Card"), you can also enter just the first letter of major credit card names and it will convert to that card name. We recommend you also enter a date if you use a generic entry like this. |
|
Processing |
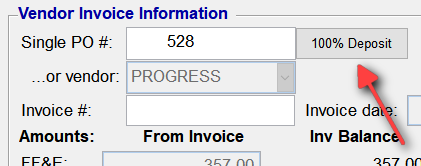
[Enhanced] The labeling and organization of the Processing command buttons have been modified to make their purpose more clear to new users. [Deprecated] The button "stub" for the Enter Vendor Deposit Invoices command has been removed since this information is easier to enter directly on the Orders screen under "Vendor Deposit Requirements." [Enhanced] The Enter Vendor Final Invoices command has been optimized for its two most common uses: Entering an invoice for a single PO and applying a deposit to a single fully prepaid order (where the required deposit was 100% and no changes occurred). The top of the screen has been reorganized to allow you to enter the PO number first. New shortcut: If you are processing the vendor invoice for an order that was currently highlighted on the Order or Expediting screens, you can double-click within the "Single PO #" field (see image below) to automatically insert that order number into it. To avoid errors, once you process the highlighted order like this, the double-click option is disabled for the current usage of this command. If the entered order is fully paid with no changes, you can click the 100% Deposit button next to the "Single PO #" field:
This button is only enabled if the net balance for the order after subtracting the deposit is zero. It assumes that all items are eligible and does all processing and selection, including copying the original deposit invoice number and date from the purchase order. You can then can then select "Accept" to process the invoice. Using this feature assumes the order had no changes and the deposit matches the final charge on the invoice (a partial invoice must be processed normally). If an unexpected change occurs after processing an order this way, you have two options: 1) reverse the vendor invoice entries with the Update Order Status command, then re-process or 2) add an adjusting item to the order to be processed separately. If you realize this after clicking on the 100% Deposit button, the button will allow you to cancel and process the order normally. It also deselects any items that were selected. The Help section for Entering Vendor Final Invoices has been updated and expanded to cover these changes, as well as how to handle a invoice that includes only a partial quantity. [Enhanced] The Processing functions used to apply checks or credit card charges to outstanding balances have interface improvements:
[Enhanced] The table in the Help section for Processing Tools has been updated to better reflect current usage. [Fixed] Orders that were voided after being issued could not be re-printed. You can now re-print a voided order that was issued. The format will included "voided" indications in the order header area and at the signature line. At this point, orders that were voided without being issued cannot be printed without being "un-voided." [Fixed] If you "unclosed" a voided order by changing the "Closed" status checkbox, the voided status was not also cleared. The system will now prompt you if an order was closed using the Void command. [Fixed] Under some circumstances, the "Enter Vendor Final Invoices" processing tool could allow an order to be processed without entering some type of invoice number and date. These elements are crucial to filtering out previously processed order items and to overall processing documentation. |
|
Expediting |
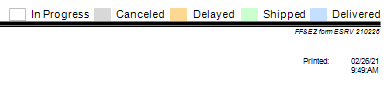
[New] A new "Delayed" field appears next to the "Will Ship" date. This can be used to indicate an item that has been delayed in some way. You can use this with or without a Will Ship date. This new status will appear in the "Status" column and as color-coding on each order item on some "Expediting Status" reports. You can set this status for the entire order (see next) or for individual items. [New] The Update Order Status command now includes an option to set and clear the "Delayed" status for all order items or leave the status unchanged. Exceptions: You cannot add a "delayed" status for an item that has been shipped or delivered with this command. Also, if you enter a "Shipped" or "Delivered" date as part of using this command, it will default to clearing the "Delayed" flag as well. [Enhanced] The Expediting screen's "Status" column has new color-coding to indicate "Delayed," "Shipped" and "Delivered" status for each item. The help section for the Expediting screen has more details about the color coding in this column. If the "Tips" option is active, you can see an explanation of the color coding by moving the mouse cursor over the column header.
On the "Expediting Status" reports, individual item / split numbers are shaded according to the status colors shown above. [Enhanced] The "Search in" tool beneath the list area now includes "Vendor Invoice #" for use in locating specific order items that appeared on a vendor invoice. Note: It is possible for two vendors to use the same invoice number (especially if you use "Pro forma" as an entry). If this happens and you are trying to use Find all to display or report on a specific invoice, you may need to then use the Query tool to add a second filter for Vendor ID or PO number or date. [Enhanced] The "Expediting Status Report by Project, Vendor, Order" and "Expediting Status Report by Vendor, Project, Order" now have an option to display the general notes for each purchase order. This option is disabled by default. (Note: Other expediting reports do not have this option because they don't use a sort order that groups items by the purchase order number.) [Fixed] The "Shipping List," "Shipping Report" and "Receiving Report" formats defaulted to "unshipped items" and "undelivered items" instead of "All Items." If you prefer reports that only print unshipped or undelivered items, set these report options to your preference, then use the Save Options command to create these variations on the base report. [Fixed] If you used Update Item Status and then reverted or canceled editing, the order itself remained locked and prevented the use of the Order screen Edit command on that order. If you saved changes, the problem did not occur. |
|
Check Requests |
[New] The right-click option on the Void command has been replaced with a new Clear Payment command for reversing applied check payments. Note that this does not remove deposits that were applied, since that update is part of entering a vendor final invoice (the invoice must be cleared using the Expediting screen's Update Order Status command). See Reversing Status Milestones for an overview. |